Create an SPL application
Edit meThe general steps to create a new SPL project are:
- Create an empty folder on your filesystem and import the folder into your workspace.
- Create a toolkit information file.
After you create your project, you can create applications. The entry point of any SPL application is called a main composite.
Create your first main composite by doing the following tasks:
- Define a namespace to organize your code. This is not necessary but is good practice.
- Create a main composite within a
.splfile.
Create the project folder
- Create an empty folder on your file system, for example,
MyStreamsProject. - Go to File > Add Project Folder and select the project folder.
Create a toolkit information file
SPL projects are also called toolkits. Each toolkit folder must include a file called info.xml in the top level of the project. This file describes the toolkit and any other toolkits it depends on.
Important: This file must be in the top level of the project.
Create a file within the folder called info.xml.
Right-click your project folder, and select New File, and enter info.xml as the file name.
For your reference, the following code snippet is an overview of the contents of what needs to be present in the file. You can copy the contents into your info.xml file to get started.
identitytag contains general details about the project, name, version and required Streams version.dependenciestag lists any toolkits you require.sabFilestag indicates which folders within the project contain files that your application will access at runtime.
<info:toolkitInfoModel
  xmlns:common="http://www.ibm.com/xmlns/prod/streams/spl/common"
   xmlns:info="http://www.ibm.com/xmlns/prod/streams/spl/toolkitInfo">
  <info:identity>
    <info:name>MyStreamsToolkit</info:name>
    <info:description>My first toolkit</info:description>
    <info:version>1.0.0</info:version>
    <info:requiredProductVersion>4.0.0</info:requiredProductVersion>
  </info:identity>
  <info:dependencies>
    <info:toolkit>
      <common:name>com.ibm.streams.cep</common:name>
      <common:version>[2.1.1,3.0.0)</common:version>
    </info:toolkit>
  </info:dependencies>
  <info:sabFiles>
    <info:include path="data/**"/>
    <info:include path="etc/**"/>

  </info:sabFiles>
</info:toolkitInfoModel>
Learn more about the toolkit information file in the documentation.
Create a namespace
You can use namespaces to organize your SPL code, similar to Python modules or Java® packages. Any folder with an empty file called .namespace is treated as an SPL namespace.
Create a folder within your project with the target namespace with the following steps:
- Select the project, right click, and click New Folder.
- Enter a name for the namespace, e.g.
my.name.space: - Create a new empty file within the
my.name.spacefolder and call it.namespace. The final folder structure should look like this:- MyStreams project
my.name.space.namespace
info.xml
- MyStreams project
Now that your namespace is created, you can create your first SPL source file.
Create a main composite
Executable SPL applications are called main composites, and they are defined in SPL source files. These files have a .spl extension.
Create a source file within a namespace:
- Right-click the
my.name.spacefolder, right-click and choose New File. - Enter the name for the new SPL file,
Main.spl. - Add the namespace declaration to the file with the following line:
namespace my.name.space;
Create a main composite
The following code is a stub for a new main composite called MyComposite in the my.name.space namespace:
namespace my.name.space;

composite MyComposite {
}
Develop the sample application
Now that you created a project, the next step is to define the appliaction graph. The application graph describes the way data is processed within the application.
Create the main composite
Create a new main composite for your application as explained in the previous section. Call it BusAlerts.
What does the application do?
Recall that this application displays alerts and advertisements within the city’s public transit vehicles as the vehicles move around the city. The buses periodically report their location. When a bus is near an area with a point of interest (POI), the application detects this and sends the alert
For example, if a bus comes within 1km of the Golden Gate Bridge in San Francisco, you want to display this message inside the bus: “Approaching Golden Gate Bridge, pedestrian bridge is closed.”
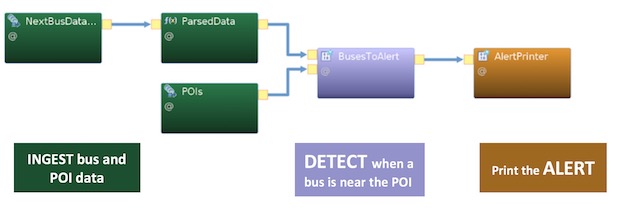
You will develop the application in three steps:

As shown in the preceeding image, the data is processed in 3 main steps:
- Ingest data about moving buses.
- Use the data from step 1 to determine when a bus is near a POI.
- Send an alert to the bus.
Tip: When you develop Streams applications, first break down the application into individual tasks, and then find one or more operators to perform each task.
Use operators to process data in steps
Remember, Streams applications are made up of operators. Each operator performs a specific task with an input stream of data and then produces an output stream that is the result of the processing.
Sample operator invocation The following image is a generic overview of an operator declaration, with the name of the operator that will be invoked, and its input and output. Every operator in your application will follow this format.
- Operator kind: The type of the operator, e.g.
FileSourceorGeofence. - Input stream (optional) - The stream of data to be processed by the operator
- Output stream (optional)- The results of the operator’s action on the incoming data.
- Output stream schema - Describes the content of each outgoing tuple

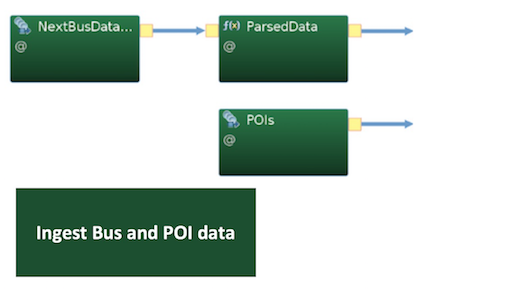
Step 1: Ingest data
All Streams applications start with ingesting the data that will be analyzed.
In this case, the data you are processing is the location of each bus as it is reported.
Your first task is to convert the data in the file to a stream that can be consumed by our data processing operators. You’ll use a FileSource operator to create a stream that contains the data from the file:
composite BusAlerts {
    graph
    	stream<xml locationXMLDoc> NextBusData_FromFile = FileSource()
    	{
    		param
    			file : getApplicationDir() + "/data/saved_BusLocations.txt" ;
    	}
}
Streams applications are directed graphs of connected operators, so the first line in the composite is a graph clause, which denotes the beginning of the application.
Next, you have the operator invocation, with the following properties:
- Operator kind:
FileSourcethat reads data from a file - Input stream: There is no input stream because it is the start of our Streams application.
- Output stream: The output schema is
NextBusData_FromFile, which is a stream of the lines in the input file. -
Output stream schema - Each tuple is an XML string from the file, with the following format:
<vehicle id="5764" routeTag="24" dirTag="24___I_F00"
 lat="37.734356" lon="-122.390739" secsSinceReport="9"
 predictable="true" heading="218" speedKmHr="0"\>
Step 1b: Parse the XML data
Now you have a stream of XML strings coming from the NextBusData_FromFile operator. But you need to extract the bus ID, latitude, and other information from this XML string.
For this step you will send the NextBusData_FromFile stream to an operator called ParseNextBusData:
stream <rstring id, TimeMillis reportTime, float64 latitude, float64 longitude> /*Output schema*/
    ParsedDataStream /*Output stream name*/ = ParseNextBusData (NextBusData_FromFile /*input stream*/) /*Operator name*/
	{
		param
			agency : $agency ;
	}
The output stream ParsedDataStream contains the individual attributes that describe the location of each bus.
The ParseNextBusData operator is a special kind of operator called a composite operator. It is called a composite operator because it is made up multiple operators. It uses the XMLParse operator to parse the XML data. You can look at its source in BusAlerts/my.name.space/ParseNextBusData.spl.
Next, use the stream of bus locations, to detect when a bus is near a point of interest (POI).
The points of interest for our application have been defined in another file, called poi.csv. The format of this data is as follows:
#POI Name, Message to Bus, Location
"Golden Gate Bridge","Approaching Golden Gate Bridge, pedestrian bridge is closed.","POINT (-122.46746489758902 37.79717439889875)"
AT&T Park,"If the Giants win, show your game ticket to get a discount on a GetThere taxi after the game. Goo giants!","POINT (-122.3914585 37.7785951)"
Mission Dolores Park,"Security incident near Mission Dolores Park, road and sidewalk closures in effect.","POINT (-122.4457047 37.7648361)"
"Fairview Mall","Parade on Yonge Street from 10am to 6pm, expect major delays.","POINT (-79.3463243 43.7770863)"
Each line describes a point of interest, the alert to send to the buses, and the location of the point of interest. Since the data is in a file, use another FileSource to read this data:
stream<rstring POI_ID, rstring locationWKT, rstring message> POI_FromFile = FileSource()
{
    param
        file : getApplicationDir() + "/data/poi.csv" ;
}
Note that the output schema of the POI_FromFile stream matches the format in the CSV file.
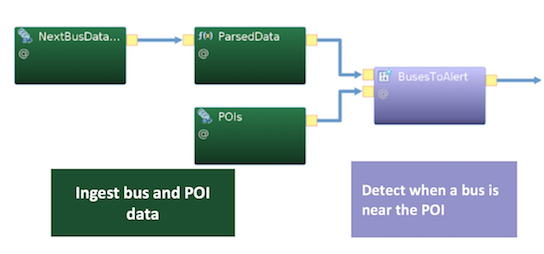
Now you have two streams of data, POI_FromFile and NextBusData_FromFile that you are ready to process in your next step. So far, the application graph looks like the following image:
Step 2: Detect when a bus is near a POI
The next step is to detect when a bus is within 1km of any of the known points of interest.
Note that the Geofence operator is designed to solve this exactly this type of problem. But for demonstration purposes you can write the logic yourself.
Even though Streams provides dozens of built in operators, your unique needs might require you to write your own code.
You can write your own code by using the Custom operator. The Custom operator is, as the name implies, for custom code. Here is the operator’s stub:
stream<rstring id, rstring poi, rstring message, float64 distance> BusesToAlert =
      Custom(ParsedDataStream; POI_FromFile)
{
    logic
        onTuple POI_FromFile : {
            //process POI
        }
        onTuple ParsedDataStream : {
          //A bus has just sent its location
          //check its distance from the POIs,
          //submit an alert if necessary.
        }
}
Notice that there are 2 input streams,the parsed stream of bus locations (ParsedDataStream), and the stream of POIs (POI_FromFile). When the operator detects that a bus is near the POI, it submits a tuple of type Alert to the output stream, BusesToAlert.
The Alert type contains the following information:
- The
idof the bus. - The name of the
poi. - The
messageto send to the bus. - The current computed
distancefrom the POI.
The Alert type has the following definition:
type Alert = rstring id, rstring poi, rstring message, float64 distance;
Enter the preceeding line at the top of the file, right before the line composite BusAlerts. Next, add a logic clause to the Custom operator.
The logic clause is executed on each tuple that is received by the operator. Because you have two input streams, you have two onTuple clauses.
If the tuple is from the POI_FromFile stream, the code within the onTuple POI_FromFile clause is executed. Otherwise the code within the onTuple ParsedDataStream clause is executed.
stream<Alert> BusesToAlert  = Custom(ParsedDataStream; POI_FromFile)
{
  logic
    state :
    { //1
       //list of POIs
      mutable list<POI_Type> POIList = [ ];
      float64 radius = 1500.0;
    }

    onTuple POI_FromFile:
    {
    //3 add the POIs to a list
      appendM(POIList, POI_FromFile) ;
    }

    onTuple ParsedDataStream :
    {
      //A bus has just sent its location
      //convert the lat/lon to WKT
      rstring busWKT = point(longitude, latitude) ;
      for(POI_Type poi in POIList)
      {
    //3 calculate its distance from the POI
        float64 distanceFromPOI = distance(busWKT, poi.locationWKT) ;
        //4 is the bus near the POI?
        if(distanceFromPOI <= radius)
        {
          //bus is near POI.
          //5 Submit an alert tuple
            mutable Alert out = { } ;
            out.distance = distanceFromPOI ;
            out.poi = poi.POI_ID ;
            out.message = poi.message ;
            //copy input data to output
            assignFrom(out, ParsedDataStream) ;
            submit(out, BusesToAlert) ; //5
        }
      }
    }
}
The code is marked with numbers that indicate lines of interest:
- The
stateclause is used to define two variables: a list to keep track of the known points of interest and the maximum distance from the POI. - When the operator receives a tuple from the
POI_FromFilestream, the tuple is added to the list. - When the operator receives a bus’ location, then for each point of interest, the
distancefunction is used to compute the distance between the current location of the bus and the POI. - Check if the computed distance is within the predefined
radius(1 km or 1000.0 m) - If the bus is within the 1km radius, create and send an alert tuple.
You have now completed step 2 of the application.
Step 3: Send the alert
The last step is to send the alert. Use the printStringLn function in another Custom operator to print the message to the screen.
() as AlertPrinter = Custom(BusesToAlert as In)
{
  logic
    onTuple BusesToAlert :
    {
      printStringLn("Bus " + id + "  is near " + poi + ", message = " + message  );
    }
}
So now your application is complete:
View the complete source in my.name.space/BusAlerts_CachedData.spl.
Run the application
To see this application in action, go to the next section to learn how to build and run it.
Key takeaways
From this basic application here are a couple of things to notice:
Custom operators
Custom operators are an important part of Streams development to do quick tasks such as printing data to console for verification, or other tasks for which no operator exists.
The BusesToAlert operator demonstrated the following functionality:
- Using and iterating over a list
- Handling multiple input streams
- Submitting a tuple from a Custom operator
Source and Sink operators
Looking at the preceding graph again, notice the following points:
- The
POIandNextBusData_FromFileoperators do not take any input, because they are source operators. They produce streams by reading data from external systems. - Conversely, the
AlertPrinteroperator does not produce any output, because it is a sink operator. Sink operators usually send the results of a Streams application to an external system, such as another file, or a database or a messaging system.
Best practice: operator granularity
You might notice that the last two operators in the graph are both Custom operators. So you might wonder, why not print the alert in the first operator instead of sending the data to a new operator whose only job is to print the message?
The application uses two operators because it is good practice in Streams to keep operators simple by performing one task per operator. Separating the tasks improves performance because while one operator is performing the detection, the sink operator can spend time writing to the target system.
Learn about operator granularity and other Streams best practices in the documentation.