Configure Atom
Edit meDownload the Streams Packages for Atom
If necessary, download and install Atom.
To install the Streams plug-in packages for Atom:
- In Atom, open the package installation screen:
- Mac: Atom > Preferences > Install > Packages
- Linux: Atom > Preferences > Install > Packages
- Windows®: File > Settings > Install > Packages

- Search for each of the following packages and install them:
- atom-ide-ui
- ide-ibmstreams
- language-ibmstreams-spl
- build-ibmstreams
- In Atom, open the preferences to install the Streams themes:
- Linux: Atom > Preferences > Install > Themes
- Mac: Atom > Preferences > Install > Themes
- Windows®: File > Settings > Install > Themes
- Search for and install the following themes:
- streams-dark-syntax
- streams-light-syntax
Specify the Streams instance
Instead of downloading the Streams compiler and runtime to create your applications, applications that are created in Atom are sent to a remote Streaming Analytics service to be compiled and run.
You may build and run your applications using one of the following cloud-based versions of Streams:
- The Streaming Analytics service in the IBM Cloud, or
- The Streams add-on in IBM Cloud Pak for Data.
Option 1: Connect to IBM Cloud Pak for Data
A provisioned IBM Streams add-on is required. If you need to provision an add-on, follow the steps in the [Streams add-on documentation](https://www.ibm.com/support/knowledgecenter/SSQNUZ_current/com.ibm.icpdata.doc/streams/intro.html). 1. Copy the URL of your IBM Cloud Pak for Data installation. This is the URL used to access the IBM Cloud Pak for Data environment in your browser. It should be of the form `https://10.36.210.214:[port]`. 2. Go to the Atom packages page. See the preceeding section for instructions on how to find it. Find the **build-ibmstreams** package and click **Settings**. 4. Under **Build and submit system**, choose **IBM Cloud Pak for Data Streams add-on** from the drop-down. 5. Paste the URL from step 1 in the box labelled **IBM Cloud Pak for Data url**.Option 2: Connect to the Streaming Analytics service in IBM Cloud
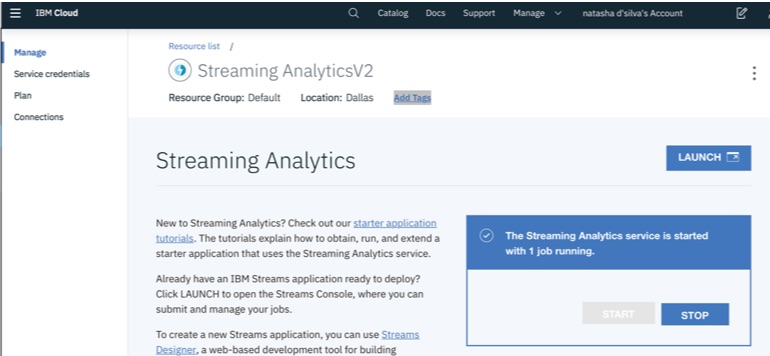
If you already have an instance of Streaming Analytics service in [IBM Cloud](https://cloud.ibm.com/), make sure that it is started and running. To create a new instance of the Streaming Analytics service, you need to complete the following steps: 1. Go to the [IBM Cloud web portal](https://cloud.ibm.com/) and sign in (or sign up for a free account). 2. Go to the [Streaming Analytics service](https://console.bluemix.net/catalog/services/streaming-analytics) page within the Catalog. 3. Enter the service name and then click **Create** to set up your service. The service dashboard opens and your service starts automatically. The service name appears as the title of the service dashboard.Add the credentials for your Streaming Analytics service
In order for Atom to connect to your Streaming Analytics instance, your build-ibmstreams package needs to be configured with your instance’s service credentials:
-
From the IBM Cloud dashboard, click the instance of the Streaming Analytics service you created earlier to go to the service’s main page.
-
Make sure the service is started, if not, click Start.
-
Click Service Credentials to get the credentials for the service. If there are no credentials listed, click New Credentials and accept the defaults to create one.
- Copy the credentials:
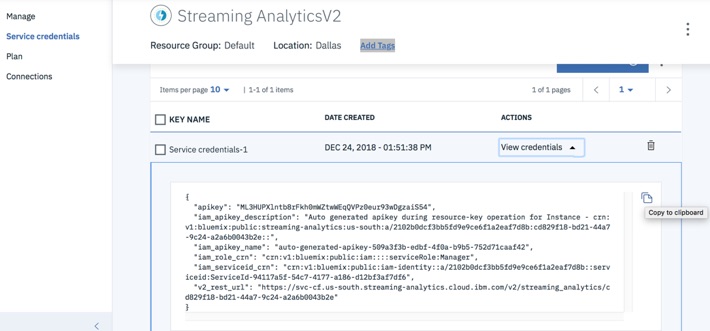
- Go to the Atom packages page. See the preceeding section for instructions on how to find it. From the Packages page, find the build-ibmstreams package and click Settings.
- Under Build and submit system, choose IBM Cloud Streaming Analytics Service from the drop-down.
- Paste the credentials you copied in to the IBM Streaming Analytics Credentials text box.
Add a toolkits folder
-
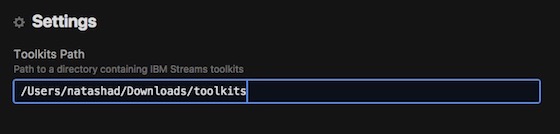
Designate an empty folder on your local filesystem as your toolkits directory. This folder will contain any additional toolkits that you want to use in your application. For more information, see the section on extending your application with toolkits to learn more.
-
Go to the Atom packages page. See the preceeding section for instructions on how to find it. From the Packages page, find the ide-ibmstreams package and click Settings. Enter the path to the toolkit directory that you created in the Toolkits Path.
Switch to Atom from Streams Studio
If you have used Streams Studio, the following list summarizes some important things to look out for.
-
SPL projects from Streams Studio can be used in Atom without having to make any changes. See the importing your code section for instructions.
-
Adding a Streams toolkit to your workspace is discussed in the toolkits section.
-
Although the SPL graphical editor is not available, you can view an application graph in the Streams Console.
-
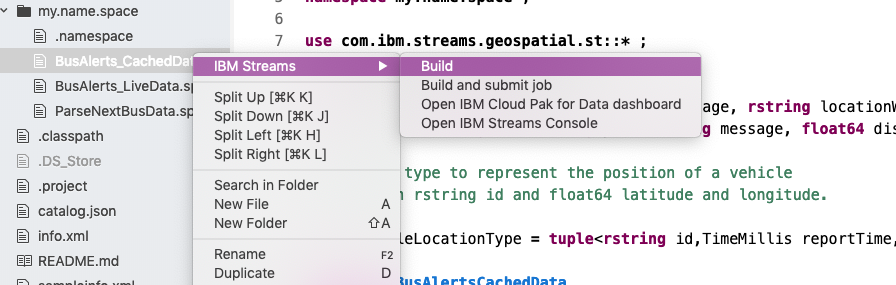
Build Configurations are not used to compile or run applications from Atom. To compile an SPL composite, you select the SPL file containing the composite, right click, and choose Build or Build and submit job.
-
Streams installation, instance and domain management: SPL plug-ins for Atom do not include any domain or instance management features because your Streams instance is created and managed in the cloud.
-
Application Monitoring:
You can monitor
Streams applications can be monitored using the Job Graph or the Streams Console. The tool you'll use depends on your development environment and/or preference. The Job Graph is only available in Cloud Pak for Data, but the Streams Console is included with all versions of Streams.
Using the Job Graph
The Job Graph is available in the CPD web interface
For the Job Graph in CPD, see this section.
Using the Streams Console
If you are not using Streams in CPD or are looking for a more advanced alternative to the Job Graph, you can monitor the health of your Streams application and cluster using the Streams Console.