Module 3 - Customizing for input files in CSV format
Edit meObjectives
In module 2, you created an SPL project in Streams Studio using the Telecommunications Event Data Analytics (TEDA) wizard. The SPL project is a simple mediation application (ITE application) with sample code that is able to process the provided sample data.
In this module, you customize the ITE application. You discuss the format of the input data and the requirements according to the internal data schemas. Then, you create and customize a file reader for processing comma-separated values (CSV files).
At the end of this module, you have a scalable Streams application that processes Call Detail Records (CDRs) for text messages (SMS) and voice calls, which are stored in CSV files. The application writes the data into output files in CSV format as is, which means without applying any transformation.
After completing this module you should be able to:
- Describe the requirements for the tutorial application
- Describe the purpose of the file ingestion and the file reader
- Disable the sample code and enable the customizable code parts of the ITE application
- Configure the file ingestion
- Configure the file reader
- Customize the data schema
- Implement a CSV file reader
Prerequisites
You completed module 2, which guided you through the creation of a TEDA-based sample mediation application.
Concepts
Requirements for the tutorial application
A mobile network consists of hundreds of network elements that generate call detail records (CDRs) or event data for each phone call, text message, internet activity, or even a simple walk from one location to another. The number of records per day varies between millions and billions. In many cases, the network elements are from different vendors. For this tutorial we assume that Mobile Switching Centers (MSCs) from different vendors store their CDRs in files. The files are stored in a landing zone that is accessible by the ITE application using standard file I/O.
As a telecommunications provider you want to analyze these records to run campaigns, improve user experience, improve your mobile network or call center, or to detect fraud. You need a system that unifies your source data, runs near real-time analytics, and scales with your increasing network traffic.
The ITE application shall process the CDR input files that are provided - for this module - in CSV format. Each row is an independent data set, the so-called record or call detail record (CDR). Each CSV file can contain two types of records, voice and SMS CDRs. The ITE application produces one output file for each input file. The output file uses the CSV format, too, having the superset of all input columns.
The filename schema
The CSV input files have the CDR_RGN<MSC_ID>_<YYYYMMDDhhmmss>.csv naming schema with MSC_ID being a unique identification code for the MSC and YYYYMMDDhhmmss being a timestamp, for example, the file’s creation time. The MSC that generates CSV CDRs, uses MSC_ID 1.
The CSV input files
The first column of the CSV file contains the record type. Depending on the type, the following columns describe a voice CDR or an SMS CDR. Voice CDRs have 20 attributes, and SMS CDRs only 15, whereas the SMS attributes are a subset of the voice attributes. The following table shows the columns of the records.
| Column | Voice CDR | SMS CDR |
|---|---|---|
| 1 | RecordType = 1 | RecordType = 2 |
| 2 | RecordNumber | RecordNumber |
| 3 | CallReference | CallReference |
| 4 | CallingImsi | CallingImsi |
| 5 | CallingImei | CallingImei |
| 6 | CallingNumber | CallingNumber |
| 7 | CalledImsi | CalledNumberTon |
| 8 | CalledImei | CalledNumberNpi |
| 9 | CalledNumberTon | CalledNumber |
| 10 | CalledNumberNpi | CallingSubsFirstCi |
| 11 | CalledNumber | CauseForTermination |
| 12 | CallingSubsFirstLac | CallType |
| 13 | CallingSubsFirstCi | CallingNumberTon |
| 14 | CauseForTermination | CallingNumberNpi |
| 15 | CallType | CallReferenceTime |
| 16 | SamMczDuration | |
| 17 | CallingNumberTon | |
| 18 | CallingNumberNpi | |
| 19 | CallReferenceTime | |
| 20 | CallingSubsFirstMcc |
The CSV output files
The output files must contain the superset of all attributes of the input files. Those attributes, which are not present in SMS CDRs, remain blank in the output files.
Other requirements
The business logic processes the files by applying the following logic:
- Remove duplicate files, which means: avoid processing files with same name again. The time, after which a file name is removed from the list of unique file names, is 15 days.
- Parse the files
- Create a common stream schema for SMS and voice CDRs
Customization Points
When customizing the ITE application, it is recommended to follow the functional flow within the application structure.
The following figure and table show the points that you need to customize in the ITE application during this module or that influence the customization like the different formats and stream schemas. Other parts don’t need to be customized because it is not necessary for this module.

| Number | Functional Block | What needs to be customized? |
|---|---|---|
| 1 | FileReader | A custom file reader is necessary to read the CSV files. |
| 1s | Stream, common FileReader output stream | Define the common output stream for all potential FileReaders, depending on the needed fields for the business logic and the output. |
Configuration
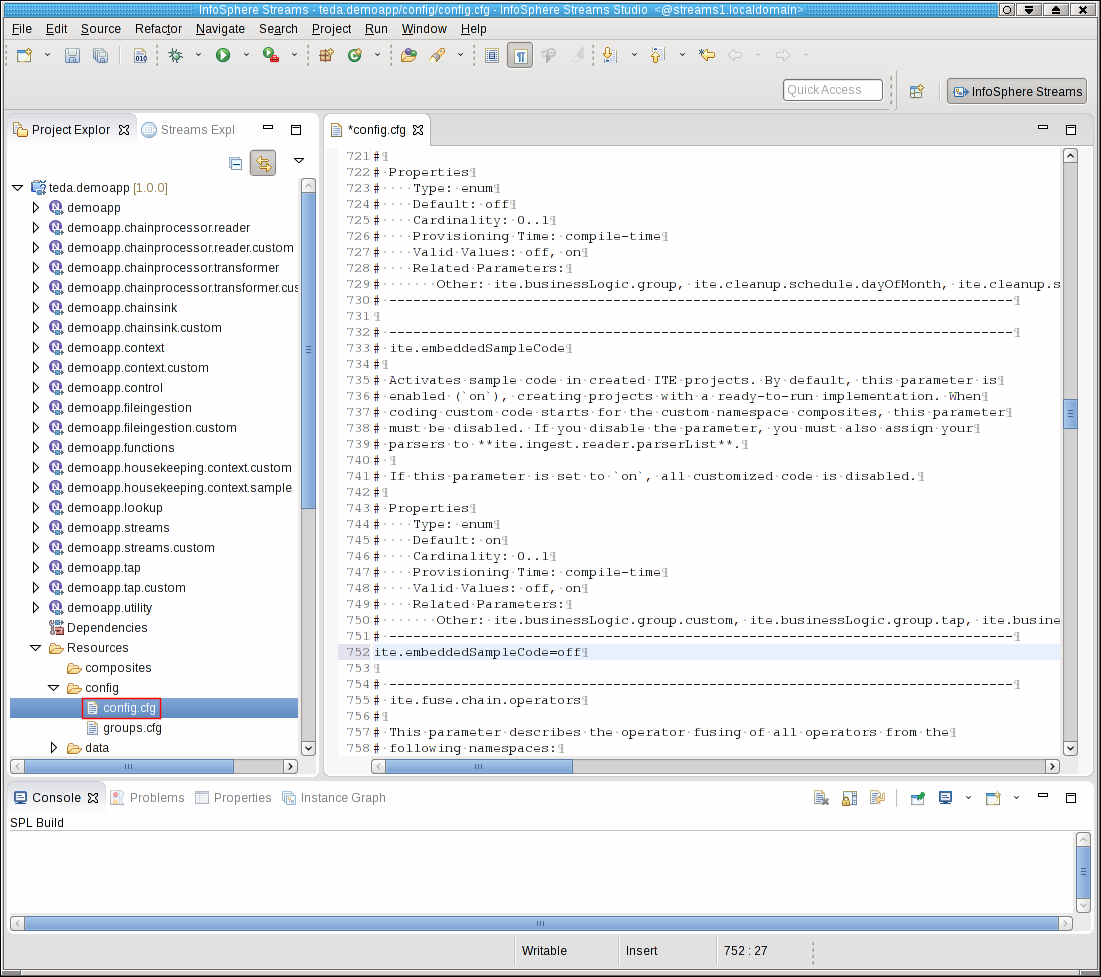
While creating an ITE or - in later modules - a Lookup Manager Application project a config/config.cfg configuration file is created that contains the compile-time parameters or submission-time parameter defaults for the application. Typically, you open the config.cfg file once and keep it open during the configuration and customization tasks because you change it during various tasks. Remember to save your changes before building the application.
If config.cfg is mentioned in a task description, this file is meant.
The configuration file contains the description of all non-deprecated parameters as well as settings that are specific to the choices made during the project creation. As an application developer, you decide which parameters are needed in the project. Lastly, it contains settings that are mandatory and need to be changed to fit to the project needs. For getting familiar with all configuration parameters, read the parameter reference in the IBM Knowledge Center under Reference > Toolkits > SPL standard and specialized toolkits >com.ibm.streams.teda > Parameter reference.
Typically, you add parameter assignments below their descriptions.
Tasks
The configuration and customization consists of the following tasks:
- Opening the config.cfg file
- Disabling the sample code and enabling the customizable code parts of the ITE application
- Configuring the file ingestion
- Configuring the file reader
- Customizing the data schema
- Implementing a CSV file reader
- Building and starting the ITE application
- Moving sample data files to the application’s input directory to process the data
- Shutting down the ITE application gracefully and cleaning up
Opening the config.cfg file
Expand teda.demoapp/Resources/config in the Project Explorer and open the config.cfg file. Keep this file open because you change it during various tasks.
Disabling the sample code and enabling the customizable code parts of the ITE application
The application framework wizard creates the project with fully functional sample code. Disable the sample code to start the customization process and to activate the customizable code parts. These customizable code parts are either empty, doing nothing, or typically contain a simple tuple forwarding. You edit the customizable code parts during the customization process by adding your algorithms and logic. Find the ite.embeddedSampleCode parameter in your config.cfg and insert following line after the parameter description.
ite.embeddedSampleCode=off
Configuring the file ingestion
According to the requirements, the file names have the CDR_RGN<MSC_ID>_<YYYYMMDDhhmmss>.csv naming schema. You configure this file name pattern to ensure that the ITE application processes only files that match this pattern. The pattern contains for our application timestamp digits and the file extension .csv.
The directory scanner shall sort the input files by name. Sorting the file names of every scan cycle ensures that the files with the oldest timestamps are processed first.
Furthermore, you enable file name deduplication and configure its lifetime with 15 days. The file name deduplication ensures that every file is processed once only. The lifetime specifies how long a file name participates the duplicate detection before it is detected as new file again.
To process files in parallel, you configure the load distribution of the file processing:
- number of parallel working processes, so-called processing chains or shorter, chains,
- the filename distribution method, and
- whether to use User Defined Parallelism (UDP) as parallelization method.
For this tutorial, you select the roundRobin distribution method with enabled UDP feature. If you select roundRobin as distribution method, the files are distributed round-robin to the processing chains. If you select equalLoad, the distribution ensures that the chains are equally loaded but you cannot use UDP. With the enabled UDP feature you can specify the number of parallel working chains at submission-time, overriding the compile-time default that is specified in the config.cfg file.
Because your custom business logic does not contain lookups from external data, you disable the schema extension for lookups.
Change the config.cfg by finding and adding following parameter assignments below their descriptions. Keep the default values for all other configuration parameters.
ite.ingest.directoryScan.processFilePattern=.*_([0-9]{14})\.csv$
ite.ingest.directoryScan.sort=ascending
ite.ingest.directoryScan.sort.attribute=name
ite.ingest.deduplication=on
ite.ingest.deduplication.timeToKeep=15d
ite.ingest.loadDistribution=roundRobin
ite.ingest.loadDistribution.numberOfParallelChains=2
ite.ingest.loadDistribution.udp=on
ite.ingest.reader.schemaExtensionForLookup=off
Configuring the file reader
You create a custom file reader to read your CSV input files. Your custom CSV file reader is a composite operator. You configure its name in the config.cfg file.
The configuration is done by assigning a composite name to a certain file type string. In this module, you have only one type of files, the CSV files, and you use FileReaderCustomCSV as composite name. You implement the composite in one of the next steps. Change the parameter ite.ingest.reader.parserList in the config.cfg file to following value.
ite.ingest.reader.parserList=CSV|FileReaderCustomCSV
Note: At this step of the tutorial, you can theoretically use any file type value. However, in preparation for using multiple file types later, you use the CSV value. The preconfigured readers FileReaderASN1, FileReaderStructure, and FileReaderCSV must be replaced with custom readers to configure them with specific operator parameters that fit to the use case, like comma separator, mapping document, end-of-line characters, and more.
Customizing the data schema
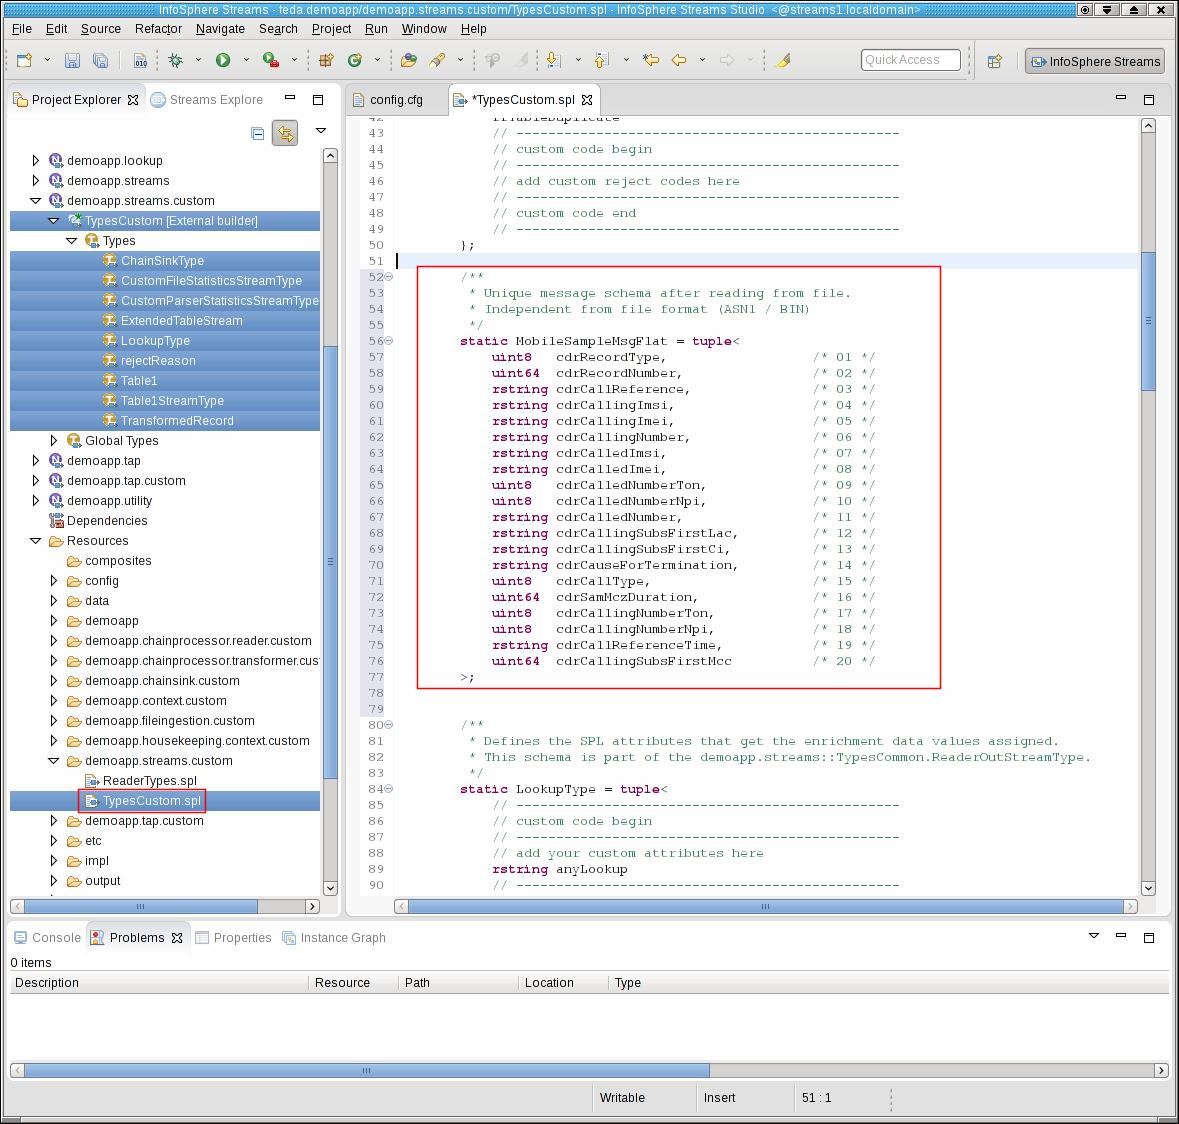
You define the output schema of your file reader. Even if you have multiple file readers for various file formats you must define one common schema to which all formats must be mapped. For now, you have only the CSV file reader. You define a reader output schema that contains all attributes from the voice CDR and the SMS CDR, which has only a subset of the attributes that a voice record has. The SPL type is named MobileSampleMsgFlat.
Insert the following tuple definition as static type into the TypesCustom composite in the teda.demoapp/Resources/demoapp.streams.custom/TypesCustom.spl file
        /**
         * Unique message schema after reading from file.
         * Independent from file format
         */
        static MobileSampleMsgFlat = tuple<
            uint8   cdrRecordType,                  /* 01 */
            uint64  cdrRecordNumber,                /* 02 */
            rstring cdrCallReference,               /* 03 */
            rstring cdrCallingImsi,                 /* 04 */
            rstring cdrCallingImei,                 /* 05 */
            rstring cdrCallingNumber,               /* 06 */
            rstring cdrCalledImsi,                  /* 07 */
            rstring cdrCalledImei,                  /* 08 */
            uint8   cdrCalledNumberTon,             /* 09 */
            uint8   cdrCalledNumberNpi,             /* 10 */
            rstring cdrCalledNumber,                /* 11 */
            rstring cdrCallingSubsFirstLac,         /* 12 */
            rstring cdrCallingSubsFirstCi,          /* 13 */
            rstring cdrCauseForTermination,         /* 14 */
            uint8   cdrCallType,                    /* 15 */
            uint64  cdrSamMczDuration,              /* 16 */
            uint8   cdrCallingNumberTon,            /* 17 */
            uint8   cdrCallingNumberNpi,            /* 18 */
            rstring cdrCallReferenceTime,           /* 19 */
            uint64  cdrCallingSubsFirstMcc          /* 20 */
        >;
You specify that your new SPL type is the schema of the output stream of the file reader. Open Resouces/demoapp.streams.custom/ReaderTypes.spl, and assign the new SPL type to ReaderRecordType.
type ReaderRecordType = TypesCustom.MobileSampleMsgFlat;
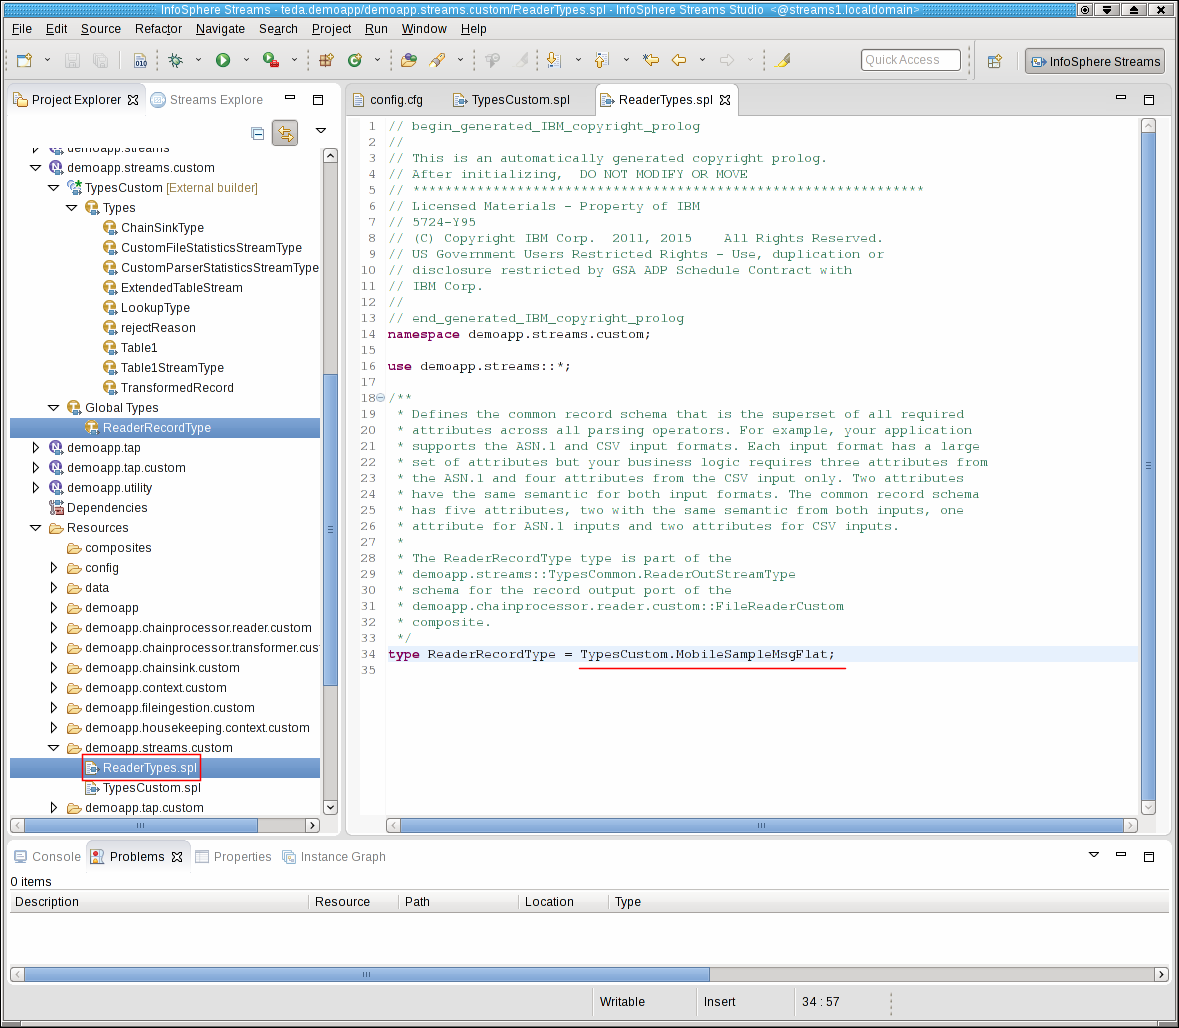
The ReaderRecordType is the stream schema that is common for all CDRs, independent from whether they come from CSV, ASN.1 or binary files or are voice or SMS CDRs. It is the input for the business logic in the ITE transformer block. The business logic determines from the cdrRecordType attribute, which kind of CDR it is: voice or SMS.
Implementing a CSV file reader
As mentioned before, you create a FileReaderCustomCSV composite for CSV file reading. The framework project wizard generates just one empty FileReaderCustom composite in FileReaderCustom.spl. If a project needs only one file reader, this SPL file can be customized, but projects often need different file readers. It is recommended to copy the original FileReaderCustom.spl file to FileReaderCustomCSV.spl for creating the custom file reader. You find this file in directory in Streams Studio under teda.demoapp/Resources/demoapp.chainprocessor.reader.custom. Copy the file in Streams Studio.
Open the teda.demoapp/Resources/demoapp.chainprocessor.reader.custom/FileReaderCustomCSV.spl file and rename the contained FileReaderCustom composite to FileReaderCustomCSV. Remember that you specified this composite name for the ite.ingest.reader.parserList parameter and assigned to the CSV file type string.
The FileReaderCustomCSV file contains the composite with the instantiation of a file reader, which follows the frameworks reader interfaces. The framework provides three built-in configurable file readers: FileReaderCSV, FileReaderASN1, and FileReaderStructure. You select the CSV file reader and set its parameters, which must match the use case requirements.
Either copy and paste the following code to the FileReaderCustomCSV.spl file replacing the existing composite operator, or adjust the inner composite name and the parameters one by one comparing the following and the existing code.
Hint: Typically, the customizable parts of composite operators are marked with // custom code begin and // custom code end.
Hint: If you want to set the quoted parameter of the FileReaderCSV operator, for example CSVParse.off, then you need to add the use com.ibm.streams.teda.parser.text::*; statement in your FileReaderCustomCSV composite.
public composite FileReaderCustomCSV (
    input
        stream<TypesCommon.FileIngestSchema> FileIn;
    output
        stream<TypesCommon.ReaderOutStreamType> ReaderRec,
        stream<TypesCommon.ParserStatisticsStream> ReaderStat
)   {
    param
        expression<rstring> $groupId;
        expression<rstring> $chainId;
    graph
        (
        stream<TypesCommon.ReaderOutStreamType> ReaderRec;
        stream<TypesCommon.ParserStatisticsStream> ReaderStat
        ) =
            // ------------------------------------------------
            // custom code begin
            // ------------------------------------------------
            // Select the file reader operator
            // a) FileReaderCSV or
            // b) FileReaderASN1 or
            // c) FileReaderStructure or
            // d) Create your own parsers based on CustomParserTemplate
            FileReaderCSV
            // ------------------------------------------------
            // custom code end
            // ------------------------------------------------
            (FileIn as IN) {
            param
                groupId : $groupId;
                chainId : $chainId;
                // ------------------------------------------------
                // custom code begin
                // ------------------------------------------------
                /**
                 * operator record stream output type.
                 */
                parserRecordOutputType: ReaderRecordType;
                /**
                 * FileReaderStructure/FileReaderCSV: The mapping document parameter
                 */
                mappingDocument: "etc/demo_csv_mapping.xml";
                // ------------------------------------------------
                // custom code end
                // ------------------------------------------------
        }
}
With this customization, you instantiate a file reader around the built-in CSV reader. You parametrize this parser operator to generate just the common CDR format. It can be directly derived from the input format of the CSV reader because all needed elements are available in the CSV structure.
You must configure the CSV reader operator with a mapping document, which specifies the mapping between the columns within the file and the attributes of the output tuple.
Providing the mapping document for the CSV file reader
If you use the built-in FileReaderCSV to read CSV files, you must provide a mapping document that specifies which CSV columns are mapped to which SPL attribute. The mapping document is an XML file.
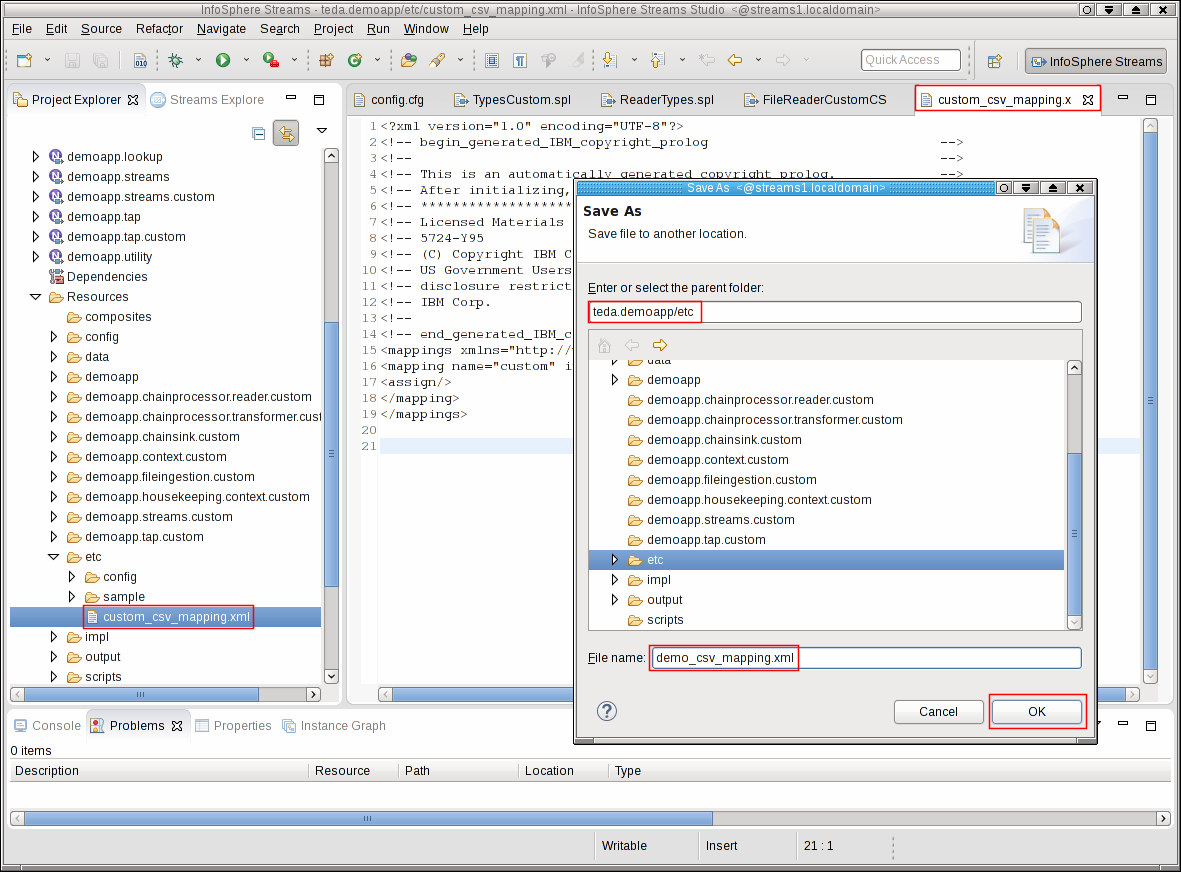
For this tutorial module, use the demo_csv_mapping.xml name as specified in the mappingDocument parameter for the FileReaderCSV operator. The file must be created in the teda.demoapp/Resources/etc directory.
Either open the teda.demoapp/Resources/etc/custom_csv_mapping.xml file and save it as demo_csv_mapping.xml by using File > Save As…, or create a new and empty demo_csv_mapping.xml file in the etc directory.
Replace the content of the XML file with the following content.
<?xml version="1.0" encoding="UTF-8"?>
<mappings xmlns="http://www.ibm.com/software/data/infosphere/streams/csvparser">
    <!-- this mapping is applied if the first CSV field contains the string "1",
    the CSV line must have at least 20 fields -->
    <mapping name="voice" filterIndex="0" filterValue="1" itemCountMin="20">
        <assign/>
        <assign/>
        <assign/>
        <assign/>
        <assign/>
        <assign/>
        <assign/>
        <assign/>
        <assign/>
        <assign/>
        <assign/>
        <assign/>
        <assign/>
        <assign/>
        <assign/>
        <assign/>
        <assign/>
        <assign/>
        <assign/>
        <assign/>
    </mapping>
    <!-- this mapping is applied if the first CSV field contains the string "2",
    the CSV line must have at least 15 fields -->
    <mapping name="sms" filterIndex="0" filterValue="2" itemCountMin="15">
        <assign attribute="cdrRecordType" index="0"/>
        <assign attribute="cdrRecordNumber" index="1"/>
        <assign attribute="cdrCallReference" index="2"/>
        <assign attribute="cdrCallingImsi" index="3"/>
        <assign attribute="cdrCallingImei" index="4"/>
        <assign attribute="cdrCallingNumber" index="5"/>
        <assign attribute="cdrCalledNumberTon" index="6"/>
        <assign attribute="cdrCalledNumberNpi" index="7"/>
        <assign attribute="cdrCalledNumber" index="8"/>
        <assign attribute="cdrCallingSubsFirstCi" index="9"/>
        <assign attribute="cdrCauseForTermination" index="10"/>
        <assign attribute="cdrCallType" index="11"/>
        <assign attribute="cdrCallingNumberTon" index="12"/>
        <assign attribute="cdrCallingNumberNpi" index="13"/>
        <assign attribute="cdrCallReferenceTime" index="14"/>
    </mapping>
</mappings>
A detailed description of the mapping file of the CSV parser is contained in the toolkits reference in the IBM Knowledge Center under Reference > Toolkits > SPL standard and specialized toolkits > com.ibm.streams.teda > com.ibm.streams.teda.parser.text > CSVParse.
The following mapping principle is used:
Assign a column from the CSV file to a certain SPL output schema attribute. The CSV file can contain two different structures, a voice CDR (first column value is “1”, 20 attributes expected) and an SMS CDR (first column value is “2”, 15 attributes expected). Both structures contain the RecordType as first attribute, which reflects the type of record. This attribute is used to select the mapping.
So the mapping for the voice CDR is:
<mapping name="voice" filterIndex="0" filterValue="1" itemCountMin="20">
And the mapping for the SMS CDR is:
<mapping name="sms" filterIndex="0" filterValue="2" itemCountMin="15">
You specify the assignment of a column value in the CSV file to an attribute of the output schema by using an assign tag.
A voice CDR in the CSV file has the same attributes in the same order as the output tuple of the parser. That’s why, you can use a simple assign element for each column of the voice CDR:
<assign/>
An <assign/> XML element without attribute XML attribute means that the next SPL attribute is used for the assignment. A missing index XML attribute means that the next CSV column is used for the assignment.
Since the SMS CDR has fewer attributes, you must map each column to its corresponding output schema attribute:
<assign attribute="cdrRecordType" index="0"/>
<assign attribute="cdrRecordNumber" index="1"/>
...
cdrRecordType and cdrRecordNumber are attributes of the SPL output type. The index attribute denotes the column number in the CSV file. The first column in the CSV file has an index of zero.
Note: The index XML attribute can be omitted if the indexes are increasing without gaps. However, for a better understanding of the mapping principle the index attributes are included in the mapping for the SMS record.
Note: Although used for the mapping of the voice CDR (to explain the incrementing index), it is recommended to always provide the attribute and index values, so the mapping is visible.
Building and starting the ITE application
To build the ITE application, right-click on the teda.demoapp project in the Project Explorer, and select Build Project from the context menu. Then, start the Monitoring GUI. Remember that you have installed the Monitoring GUI in the MonitoringGUI directory directly under your home directory. Open a terminal window and run the following commands:
cd $HOME/MonitoringGUI
./teda-monitor.sh
Now start the ITE application. Go to the Project Explorer.
- Expand the namespace demoapp.
- Right-click on ITEMain [External builder].
- Select Launch… from the menu. The Edit Configuration dialog window opens.
- You can keep all submission time values. Click Continue.
- In the Save Changes dialog, click No.
The application is submitted to your Streams instance.
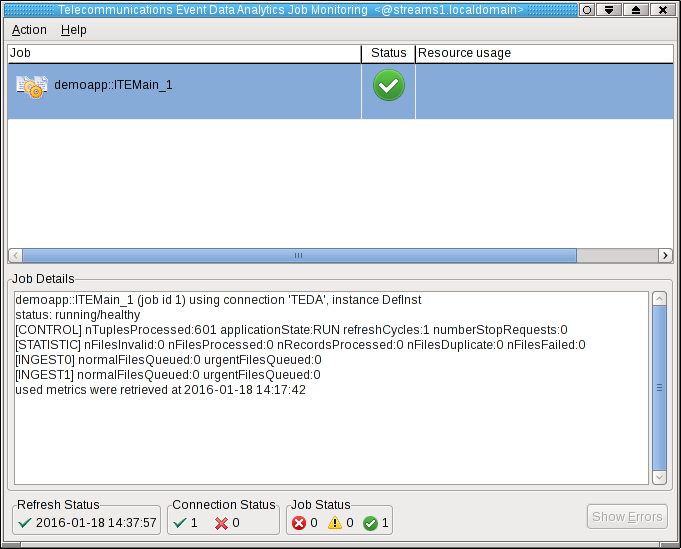
Shortly after that, the submitted application appears in the Monitoring GUI, and its status goes to healthy after some seconds. If you select the application in the Monitoring GUI, you see that all metrics have the value 0.
Moving sample data files to the application’s input directory to process the data
Since you did not configure directories for input and output, the default directories are used for the file interface. All these directories are subdirectories of the data directory of your SPL application. The input directory is WORKSPACE/teda.demoapp/data/in.
To process some files, you first copy a folder with different input files from the samples, which are provided with your Streams installation, into your SPL project. In a second step, you move the CSV files into the input directory of the ITE application. You must always move the files into the input directory to make the files appear atomically within the directory that is being scanned. You avoid that a file is processed while it is still being copied.
Open a terminal window and run the following commands to move the files into the input directory of the ITE application:
cd WORKSPACE/teda.demoapp/data/in
cp -Rv $STREAMS_INSTALL/samples/com.ibm.streams.teda/demo/teda_tutorial/teda.demoapp/data/in/archive .
mv -v archive/*.csv .
The files are processed within 5 seconds. You can press F5 in the Monitoring GUI to refresh the metrics immediately, not waiting for the next refresh cycle.
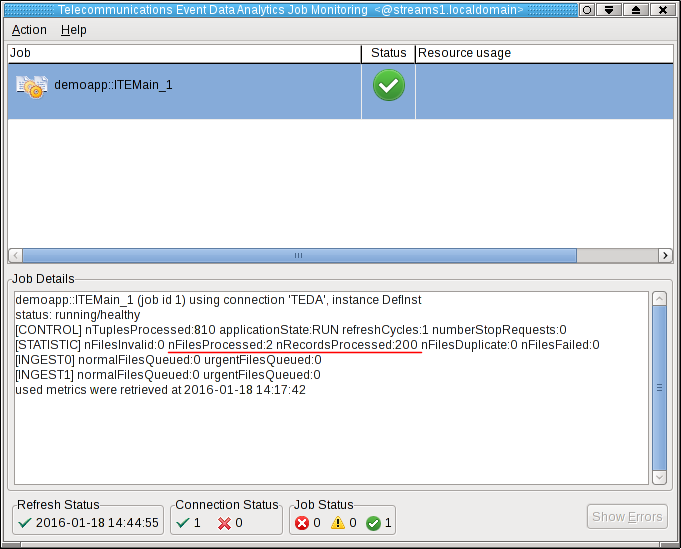
You can see, that the application processed two files with total 200 tuples.
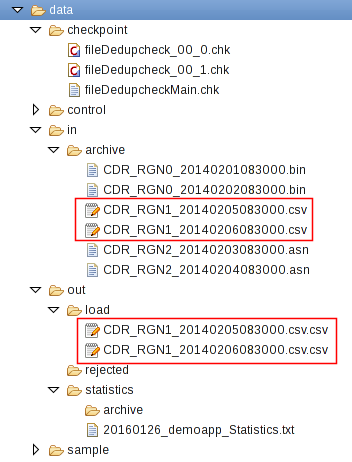
Refresh the Resources tree of the ITE project in the Project Explorer to see the newly created files. When starting the application first time, it creates a number of subdirectories in the data directory of the teda.demoapp application. These subdirectories contain various output files of the application.
What happened?
The ITE application processed the input files from the in directory and moved them back to in/archive. Note, that the archive directory contains also other files, which you copied before and which are ignored for now. The ITE application created also the files in the out/load directory. These files are the output files.
The directories and files have following content.
/checkpoint
This directory contains application internal status information. In your application scenario, it contains one file per chain and one for the application. Remember that you configured two parallel processing chains.
/in
All successfully processed files are moved from the /in directory into the /in/archive directory.
/out/load
For every processed file, the application creates an output file. The naming schema of these files is <inputFileName>.csv. The format of these output files is CSV with a number of columns that fit to the number of attributes in the common output schema. For each input tuple, you get an output tuple that has the parsed input values.
/out/rejected
If records are rejected for any reason, they appear in this directory. Here nothing was rejected.
/statistics
This directory contains the daily file processing statistic file. On day boundary, a new file is opened and the old file is moved into directory /statistics/archive.
Shutting down the ITE application gracefully and cleaning up
Shutdown and clean up the ITE application as described in Module 2: Shutting down the ITE application gracefully.
The quick summary is:
-
Use the teda-shutdown-job command line tool to gracefully shutdown the ITE application. In progress files are finished before the application is cancelled.
-
Remove the checkpoint, control, and out directories that are sub directories of the data directory. Either you remove them using Streams Studio or the rm command. This step is required to get rid of the file name history that is used for the file duplicate detection, and to start the next time from scratch.
-
Optionally, you can close the Monitoring GUI.
Next Steps
In the next module you add a simple business logic that transforms the input data before writing the output files.