Module 4 - Customizing the business logic (first steps)
Edit meObjectives
In this module, you add a data transformation to your ITE application. Remember that the application, which you created by now, reads CSV files and writes the data into output files, without transforming the records. You discuss the requirements of the processing logic and learn how to add extra attributes for the results of the transformation. You learn how to implement a business logic that applies the same rules to each incoming record.
At the end of this module, you have a scalable Streams application that processes Call Detail Records (CDRs) for SMS and voice calls, which are stored in files with comma-separated values (CSV files). It performs some simple data transformations, and writes the results into output files.
After completing this module you should be able to:
- Customizing the data schema for business logic results
- Customize the transformer to implement the needed record-by-record business-logic
Prerequisites
You completed module 3, which guided you through the customizing for input files in CSV format of a TEDA-based sample mediation application.
Concepts
Requirements for the Business Logic
The business logic processes the files by applying the following logic:
- Split the CallReferenceTime value having the ssmmhhDDMMYYCC format, into date and time with the formats CCYY-MM-DD and hh:mm:ss and store the parts in the callStartDate and callStartTime SPL attributes.
- Remove trailing ‘F’ characters from CalledNumber and CallingNumber. ‘F’ is used as a filler digit in Telephony Binary Coded Decimals (TBCD) formatted address strings to get an even number of digits.
- Convert the CallingImsi and CalledImsi attributes from TBCD format to a readable format.
The CSV output files
The output files contain the following attributes:
- The modified input attributes
- The callStartDate and callStartTime attributes, which are derived from the CallReferenceTime input attributes
Those attributes, which are not present in the input, remain blank in the output files.
Customization Points
When customizing the ITE application, it is recommended to follow the functional flow within the application structure.
The following figure and table show the points that you need to customize in the ITE application during this module or that influence the customization like the different formats and stream schemas. In the previous module, you customized the FileReader component. Other parts don’t need to be customized because it is not necessary for this module.
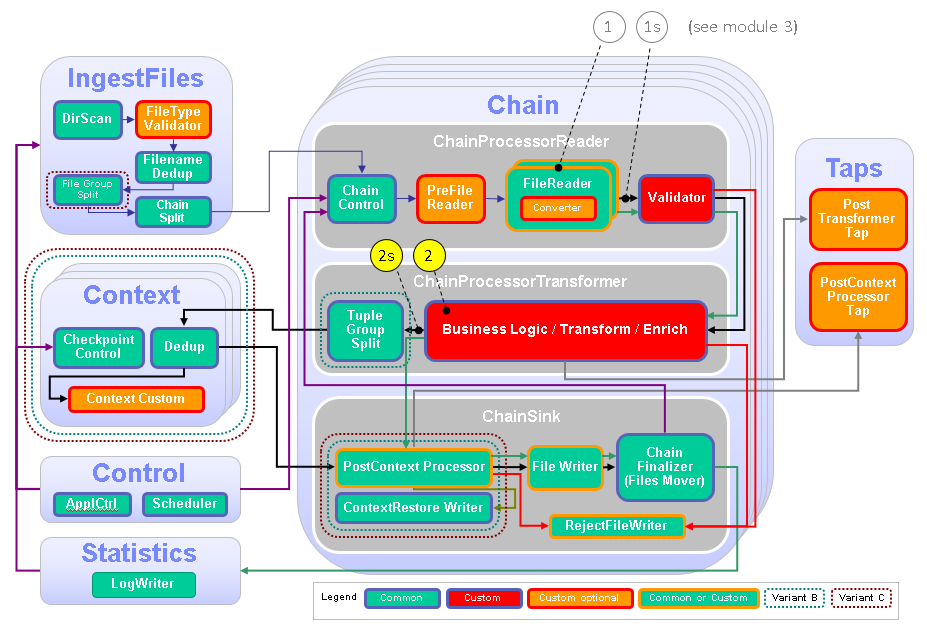
| Number | Functional Block | What needs to be customized? |
|---|---|---|
| 2 | Transformer | Customize the transformer to implement the needed record-by-record business-logic, for example, calculations and lookups. |
| 2s | Stream, Transformer output stream | Generate a transformer output stream with the necessary attributes for the file sink part. |
Configuration
While creating an ITE or - in later modules - a Lookup Manager Application project a config/config.cfg configuration file is created that contains the compile-time parameters or submission-time parameter defaults for the application. Typically, you open the config.cfg file once and keep it open during the configuration and customization tasks because you change it during various tasks. Remember to save your changes before building the application.
If config.cfg is mentioned in a task description, this file is meant.
Tasks
The configuration and customization consists of the following tasks:
- Opening the config.cfg file
- Configuring the type of the output data of the transformer
- Defining a schema extension for business logic results
- Implementing the transformer operator logic
- Building and starting the ITE application
- Moving sample data files to the application’s input directory to process the data
- Shutting down the ITE application gracefully and cleaning up
Opening the config.cfg file
Expand teda.demoapp/Resources/config in the Project Explorer and open the config.cfg file. Keep this file open because you change it during various tasks.
Configuring the type of the output data of the transformer
The transformer applies business rules to the records and optionally enriches the records with enrichment data. Here you can integrate, for example, rules engines like IBM’s Operational Decision Manager (ODM).
The transformer uses the ReaderRecordType input schema, which is the superset of all input formats, plus some more SPL attributes, which you investigate later. The result tuples of the transformer are written to one or more output files. The CSV format is used by default.
The way, how to write the output files, can be configured with the ite.businessLogic.transformation.outputType parameter. You can either select the so-called table row output type, or the record stream output type, which is the default output type.
As opposed to record stream result tuples, which contain any number of SPL attributes, a tuple in a TableStream basically contains two string attributes. One holds the name of the target table in the database, the other holds a comma separated list of all attribute values to be written into the columns of the target table. Each input record from the so-called RecordStream can result in multiple tuples in the TableStream, one for each target table the transformed record needs to be written to.
In this module of the tutorial, you select the record stream output. As the result, the output files contain all attributes from TypesCustom.TransformedRecord SPL type. This setting is the default after creating a new TEDA project. Verify that ite.businessLogic.transformation.outputType has the value recordStream or is not set at all. Then the default value is used, which is also recordStream.
ite.businessLogic.transformation.outputType=recordStream
Defining a schema extension for business logic results
The transformer creates two more attributes by splitting the CallReferenceTime into date and time. You extend the schema of the transformer output stream with the callStartDate and callStartTime attributes that get the results of the split operation.
Typically, you specify the transformer output type by modifying the TypesCustom.TransformedRecord type, which is located in the teda.demoapp/Resources/demoapp.streams.custom/TypesCustom.spl file. The TransformedRecord type is by default identical to the ReaderRecordType. The result of this default is that the transformer does not change its output schema. To include the extra attributes you have two options:
- Add the extra attributes already to the schema of the transformer input data. This method is best practice if there are only small schema extensions. Instead of using Functors for assignment, you can use the Modify operator from StreamsDev, or you can use a Custom operator that modifies the input tuple and sends it to its output. The performance of your application can benefit from doing it this way, because you avoid copying tuples in the transformer logic.
- Add these attributes to
TypesCustom.TransformedRecord. In this case, the transformer copies each tuple because input schema and output schema differ. You typically select this option if the transformation logic produces an output that is different in major parts compared to the input.
In the tutorial, you use the first option. Insert the type definition TransformResultType for the extra attributes as static type into composite TypesCustom in teda.demoapp/Resources/demoapp.streams.custom/TypesCustom.spl file.
/**
 * specifies the extra attributes that are derived from the CDR
 */
static TransformResultType = tuple<
    rstring callStartDate,
    rstring callStartTime
>;

/**
 * Specifies the output schema of the pre context business logic
 * (demoapp.chainprocessor.transformer.custom::DataProcessor) that is
 * used if the **ite.businessLogic.transformation.outputType** parameter
 * is set to recordStream.
 */
static TransformedRecord = tuple<
    // ------------------------------------------------
    // custom code begin
    // ------------------------------------------------
    // add /replace with your custom attributes here
    ReaderRecordType
    // required for ite.storage.type=tableFile and ite.businessLogic.transformation.outputType=recordStream only
    //tuple <rstring tablename, rstring tablerow> // Variant A
    //tuple <rstring tablename> // Variant B or C
    // ------------------------------------------------
    // custom code end
    // ------------------------------------------------
>;
In a second step, open the SPL file Resouces/demoapp.streams.custom/ReaderTypes.spl and extend the SPL type ReaderRecordType with TypesCustom.TransformResultType, which contains the two additional attributes.
type ReaderRecordType = TypesCustom.MobileSampleMsgFlat, TypesCustom.TransformResultType;
Now you are ready to implement the transformer operator logic.
Implementing the transformer operator logic
You implement the transformation logic in the DataProcessor composite in namespace demoapp.chainprocessor.transformer.custom. You find a default implementation in the teda.demoapp/Resources/demoapp.chainprocessor.transformer.custom/DataProcessor.spl file. It forwards the input tuples unmodified. Your transformer logic uses one Custom operator to transform and forward the input tuple and to forward the statistics tuple unmodified.
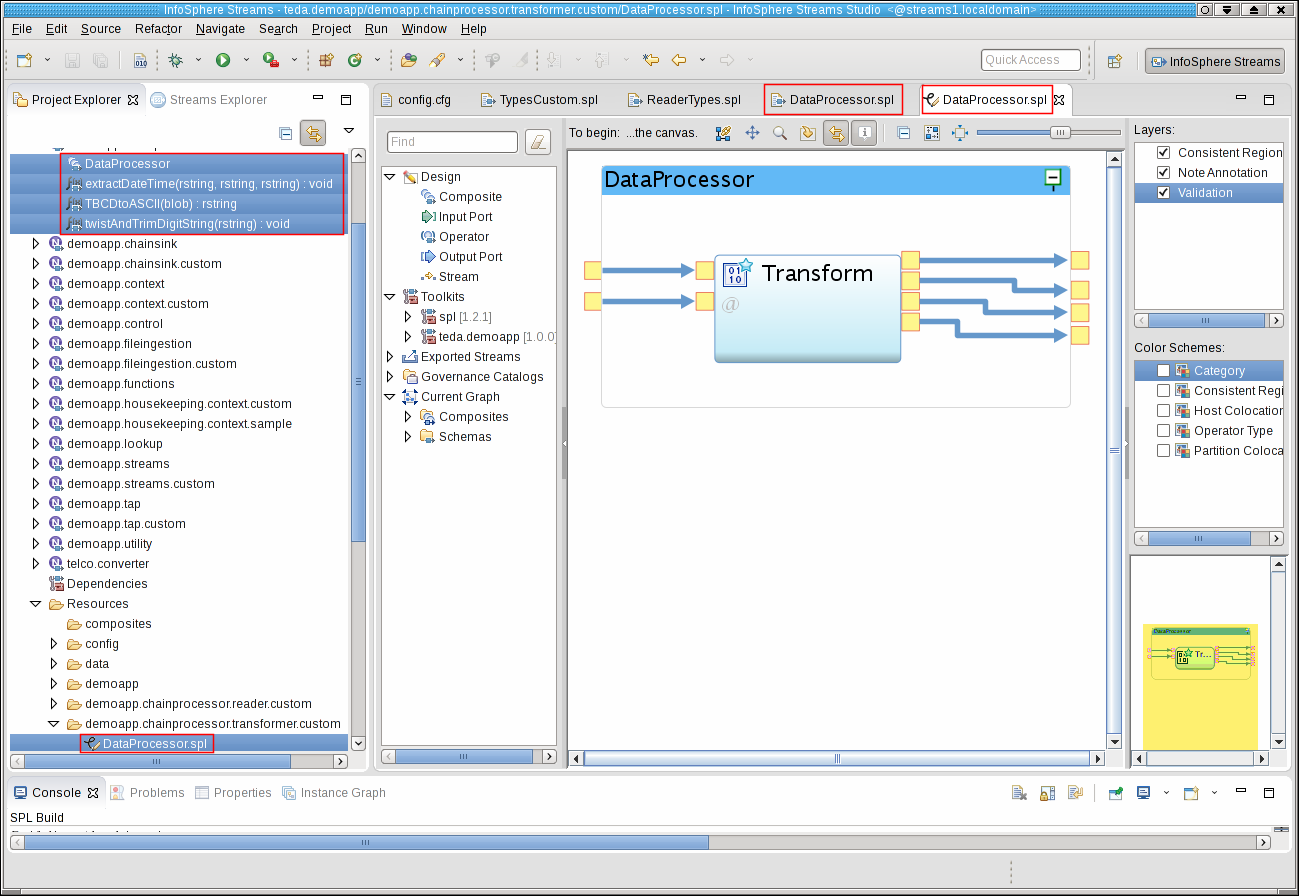
The transformer uses the custom functions, extractDateTime, twistAndTrimDigitString, and TBCDtoASCII. You implement these functions in the same SPL namespace as the DataProcessor composite, even in the same file.
Open the file DataProcessor.spl with the SPL editor of Streams Studio and replace the content with the following code:
The customization of the transformer is done. Remember to save all files before you build and test the application.
Building and starting the ITE application
To build the ITE application, right-click on the teda.demoapp project in the Project Explorer, and select Build Project from the context menu. Then, start the Monitoring GUI. Remember that you have installed the Monitoring GUI in the MonitoringGUI directory directly under your home directory. Open a terminal window and run the following commands:
cd $HOME/MonitoringGUI
./teda-monitor.sh
Now start the ITE application. Go to the Project Explorer.
- Expand the namespace demoapp.
- Right-click on ITEMain [External builder].
- Select Launch… from the menu. The Edit Configuration dialog window opens.
- You can keep all submission time values. Click Continue.
- In the Save Changes dialog, click No.
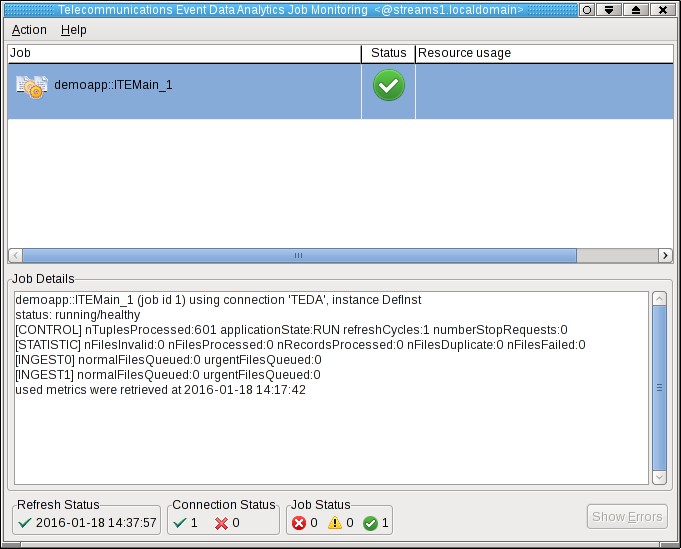
The application is submitted to your Streams instance.
Shortly after that, the submitted application appears in the Monitoring GUI, and its status goes to healthy after some seconds. If you select the application in the Monitoring GUI, you see that all metrics have the value 0.
Moving sample data files to the application’s input directory to process the data
Since you did not configure directories for input and output, the default directories are used for the file interface. All these directories are subdirectories of the data directory of your SPL application. The input directory is WORKSPACE/teda.demoapp/data/in. Your WORKSPACE/teda.demoapp/data/in/archive directory should still contain the input files that you copied in the previous module. If you deleted them by mistake, copy the data as described in module 3. Open a terminal window and run the following command to move the CSV files in to the input directory of the ITE application:
mv -v archive/*.csv .
Note:
Remember that you always move the files into the input directory to make the files appear atomically within the directory that is being scanned. You avoid that a file is processed while it is still being copied. The files are processed within 5 seconds. You can press F5 in the Monitoring GUI to refresh the metrics immediately, not waiting for the next refresh cycle.
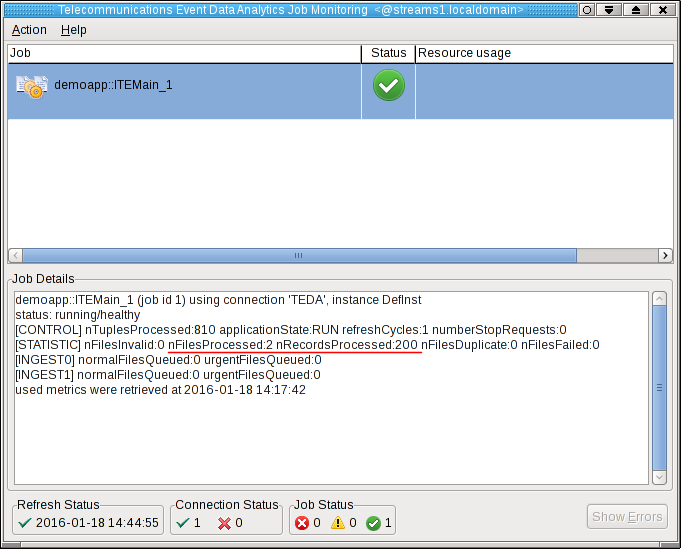
You can see, that the application processed two files with total 200 tuples.
Refresh the Resources tree of the ITE project in the Project Explorer to see the newly created files. When starting the application the first time, it creates a number of subdirectories in the data directory of the teda.demoapp application. These subdirectories contain various output files of the application.
What happened?
The ITE application processed the input files from the in directory and moved them back to in/archive. Note, that the archive directory contains also other files, which you copied before and which are ignored for now. The ITE application created also the files in the out/load directory. These files are the output files.
The naming scheme of these files is inputFileName.csv. These output files contain all attributes as defined for the output schema of the transformer, including the extra attributes. If you compare the input files with the output files, you notice that the required transformations are applied to the input data.
Below you see the first two lines from CDR_RGN1_20140205083000.csv input file and the corresponding lines from the CDR_RGN1_20140205083000.csv.csv output file:
1,1,4131002400,14040000000043,21436500000041,196105000045FFFFFFFFFFFF,13500049999957,21436549999961,05,05,186102999954FFFFFFFFFFFF,00A1,0004,00000010,03,22,06,05,00300805021420,1268 1,2,4131002400,14040000000043,21436500000041,196105000045FFFFFFFFFFFF,13500049999957,21436549999961,05,05,186102999954FFFFFFFFFFFF,00A1,0004,00000010,03,25,06,05,00350805021420,1268
The transformed and derived attributes are formatted bold.
1,1,4131002400,41400000000034,21436500000041,196105000045,31050094999975,21436549999961,5,5,186102999954,00A1,0004,00000010,3,22,6,5,2014-02-05 08:30:00,1268,2014-02-05,08:30:00 1,2,4131002400,41400000000034,21436500000041,196105000045,31050094999975,21436549999961,5,5,186102999954,00A1,0004,00000010,3,25,6,5,2014-02-05 08:35:00,1268,2014-02-05,08:35:00
Shutting down the ITE application gracefully and cleaning up
Shutdown and clean up the ITE application as described in Module 2: Shutting down the ITE application gracefully.
The quick summary is:
-
Use the teda-shutdown-job command line tool to gracefully shutdown the ITE application. In progress files are finished before the application is cancelled.
-
Remove the checkpoint, control, and out directories that are sub directories of the data directory. Either you remove them using Streams Studio or the rm command. This step is required to get rid of the file name history that is used for the file duplicate detection, and to start the next time from scratch.
-
Optionally, you can close the Monitoring GUI.
Next Steps
As next steps, you add support for processing input files in binary and ASN.1 format. You can skip these steps and continue with adding lookups to the application.