Module 9 - Campaign logic
Edit meObjectives
In this module, you extend the ITE application that you created while following the instructions of the modules 1-8. You supply some code that your application is able to implement some business logic. The generated output can be used later in a campaign management system for the improvement of customer loyalty.
At the end of this module, your application can detect situations that are annoying for the subscribers (dropped calls) and finds subscribers with a high rate of voice minutes. The tutorial does not show or implement the campaign management system.
After completing this module you should be able to:
- Configure the ITE application for group-related custom logic
- Describe the interfaces of the group-related custom logic
- Customize the housekeeping composite
Prerequisites
You finished at least module 8 of the tutorial, in which you added the record deduplication.
Concepts
Imagine, you have the project requirement to detect the following two events:
- Detecting if a subscriber experiences a high number of dropped calls per day
- Detecting if a subscriber has a high number of voice minutes per day
In both cases, your application generates events, which can be used later in a campaign management system to inform the customer about rewards and the reason for it. In this tutorial, you implement the analytics logic that is required to detect these situations and to create the events. It is called the campaign logic. Your application writes the events into files.
Definition of the Campaign Logic
You have two scenarios:
Scenario 1:
Detecting situations, which are annoying for the subscriber, like repeated dropped calls over a certain period of time. The campaign management system can use these events to offer some compensation for the inconvenience to the subscriber.
Definition:
If the number of dropped calls per day for a specific subscriber reaches a defined threshold, the logic generates an event for this subscriber.
It writes the events into a CSV file with the naming scheme DroppedCalls_CDR-groupId.csv.
The file contains the subscriber number, the date, when the dropped calls occur, and the met threshold.
Example:
The threshold for dropped calls per day is three and a subscriber with the subscriber number 41400000001313 from group 1 has four dropped calls on June, 13 2014. The occurrence of the third dropped call causes an event, which is written into the file DroppedCalls_CDR-01.csv.
The data that is written into the file is:
"41400000001313","13.06.2014",3
Scenario 2:
Detecting subscribers with a high number of voice minutes. The campaign management system can use these events to offer some reward to the subscriber.
Definition:
If the number of voice minutes per day for a specific subscriber crosses one of two defined thresholds, the logic generates an event for this subscriber. It writes the events into a CSV file with the naming scheme ThresholdN_CDR-groupId.csv. N is the number of the threshold (1, 2).
The files contain the subscriber number, the date, when the event occurred, and the number of voice minutes.
Example:
The threshold #1 for high number of voice minutes is defined as 60 minutes. The subscriber with the subscriber number 41400000001414 from region 2 reached 65 voice minutes on June, 14 2014. This aggregated volume causes an event to be written into the file Threshold1_CDR-02.csv.
The data that is written into the file is
"41400000001414","14.06.2014",65
To figure out the number of dropped calls on a day and the number of voice minutes on a day, the campaign logic collects and adds up these values for each subscriber per day. Since CDRs can occur delayed, you must hold the numbers for more than one day in memory. To make sure that the collected data does not exceed the memory limits, you specify a window of days to define for how long CDRs are accepted. For the day, the date attribute received in the CDR is used. You cannot use the date from the system for this purpose.
Looking at these definitions, you can see that you need some parameters that control the operation of the campaign logic.
You have the following parameters:
| Parameter | Description |
|---|---|
| Interval | The time slot during that the incoming CDRs are accepted as valid (for example, 5 days). Older CDRs are ignored. |
| Threshold #1 | The first threshold for voice minutes per day, for example, 60 min/day |
| Threshold #2 | The second threshold for voice minutes per day, for example, 120 min/day |
| Dropped calls threshold | The threshold for dropped calls per day, e.g. three. |
| Threshold #1 file name | The name of file to store the threshold #1 event information. |
| Threshold #2 file name | The name of file to store the threshold #2 event information. |
| Dropped calls threshold file name | The name of file to store the dropped calls event information. |
The calculation of voice minutes per day and dropped calls per day are both done only on the incoming voice record data. The incoming SMS records are not needed. A Filter operator before the campaign logic removes them. Additionally the logic focuses only on some call types. You filter for these special call types. In the tutorial, the campaign logic processes call types 1 - 4 and 6 only. You count dropped call events for all release causes except 16 and 31.
You can find an overview of the call types in the following table:
| Call Type | Value |
|---|---|
| Incoming | 0 |
| Forwarded | 1 |
| Rerouted | 2 |
| Outgoing | 3 |
| Handover | 4 |
| portedOut | 5 |
| followOn | 6 |
| terminatedToTheAnnouncementMachine | 16 |
| isupTunnelingOfSIPTunnelling | 17 |
| internationalASubscriber | 32 |
Customization Points
The following figure and table show the points that you need to customize in the ITE application during this module or that influence the customization like the different formats and stream schemes. Other parts don’t need to be customized because it is not necessary for this module.
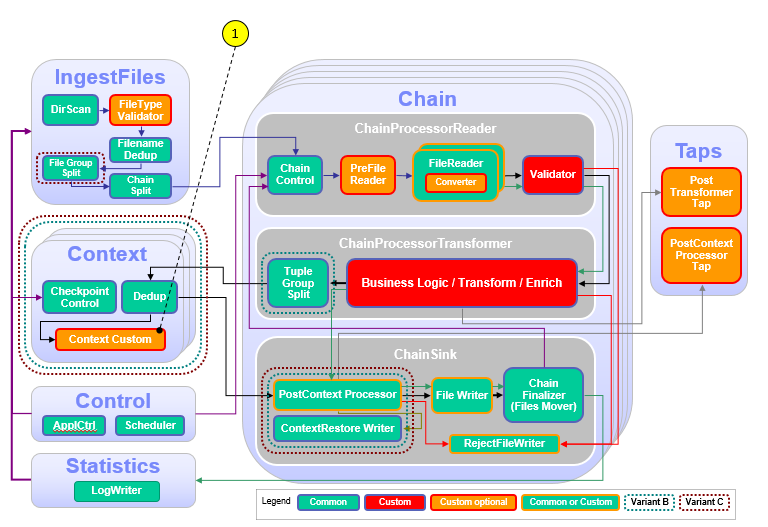
| Number | Functional Block | What needs to be customized? |
|---|---|---|
| 1 | Context / ContextCustom | Custom code is necessary to implement the campaign logic that is described in the previous chapter and to implement checkpointing for recovery and restart capability. |
Configuration
You do all configuration settings in the same manner as you did it in the previous modules. Expand teda.demoapp/Resources/config in the Streams Studios Project Explorer and open the config.cfg file. In all later steps, this opened file is referenced when talking about config.cfg.
Tasks
The configuration and customization consists of the following tasks:
- Enable the Custom Context composite
- Customize the ContextDataProcessor
- Customize the CheckpointFileRemover
Enable the Custom Context composite
The implementation of a group-related custom logic is optional in the framework and by default disabled. You implement the campaign logic as a group-related custom logic. You enable it in the config.cfg file of the teda.demoapp project:
ite.businessLogic.group.custom=on
Customize the ContextDataProcessor
The ContextDataProcessor is the composite where you implement the campaign logic. This composite requires to implement three input ports and forward tuples or punctuations to two output ports.
The input ports from which the ContextDataProcessor receive tuples, are:
-
InDataStream
This stream represents the incoming data from the input files. You need to process the tuples to realize the campaign logic. The tuples of this stream build up the state held in the campaign logic.
-
InCommandStream
This input port receives checkpoint commands in the
commandattribute. Valid commands areread,write, andclear. As soon as the command is processed, a response must be sent to the OutCommandRespStream output port. The success attribute must be set totruein case of success, orfalsein case of failure. On write the ContextDataProcessor writes it intermediate state to a checkpoint, which is restored on a read command. The commandswriteandreadare used for graceful shutdown and restart of the ITE application to restore of the custom context. Onclearcommand your logic as the chance to reset your aggregated data, for example a map. The tutorial has an empty implementation forcleartogether with a customized checkpoint file remover. The data processing already takes care of clearing out old data. -
InRecoveryStream
Tuples received on this input port are used to rebuild the state of the custom context on recovery after uncontrolled termination. Every window marker that the operator receives on this port, must be forwarded to the second composite output port as acknowledge for the chunk of data received before.
To customize your ContextDataProcessor composite, you use the already generated teda.demoapp/Resource/demoapp.context.custom/ContextDataProcessor.spl file and add the following custom SPL code to it.
The campaign logic uses functions from the demoapp.functions namespace, the first customization is to add a use clause (use demoapp.functions::*;) at the beginning of the file:
use demoapp.streams::*;
use demoapp.streams.custom::*;
use demoapp.functions::*;
Time Functions
Because of the custom time stamp format within the CDR source data, the campaign logic needs to do some special format conversion. SPL offers the capability to add functions. You add two functions that do the format conversion. The functions are:
- getDateStringFromDay(…)
- callReferenceTimeToTimstamp(…)
Download the code snippet for the functions from snippet_helper_functions.txt. Add the code directly behind the use clause you added before.
use demoapp.streams::*;
use demoapp.streams.custom::*;
use demoapp.functions::*;

<< Insert code from file snippet_helper_functions.txt here >>
Campaign Logic Parameters
Now continue with customizing the ContextDataProcessor composite. The wizard already created an empty template for this composite. When you defined the campaign logic, you already identified a set of required parameters. Add these additional parameters to the parameter section of the ContextDataProcessor composite. Add the additional code to the composite:
public composite ContextDataProcessor(...){
    param
        expression<rstring> $groupId;
        expression<rstring> $checkpointDir;
        expression<rstring> $outputDir;

        /**
         * parameters for campaign
         */
        expression<uint32> $interval : 5u;                         // interval in days
        expression<uint32> $durationPerDayThreshold1 : 15u*60u;    // 15min / day
        expression<uint32> $durationPerDayThreshold2 : 30u*60u;    // 30min / day
        expression<uint32> $droppedCallsThreshold : 5u;            // 5 or more
        expression<rstring> $threshold1FileName : "Threshold1";
        expression<rstring> $threshold2FileName : "Threshold2";
        expression<rstring> $droppedCallsFileName : "DroppedCalls";
Campaign Logic Variables
Since the campaign logic must store data in memory for the aggregation of the voice minutes and dropped calls, you need some data structures to hold that data. Therefore, you define two custom types. You define them in the type section of the composite. So again add the following code to the composite:
type
    /**
     * record to aggregate and hold status information for one day
     */
    DayAggregateType = tuple<
        uint32 daySince1970,
        uint32 callDurationPerDay,
        uint32 droppedCallsPerDay
    >;

    /**
     * record to hold subscriber data
     */
    SubscriberDataType = tuple<
        list <DayAggregateType> intervalDays
    >;

    /**
     * campaign metrics data send to MetricsSink operator
     */
    CampaignMetricsType = tuple<
        int64 totalCDRs,
        int64 smsCDRs,
        int64 failedCDRs,
        int64 duplicateCDRs,
        int64 ignoredCDRs,
        int64 sizeofSubscriberMap,
        int64 totalNumberOfDays
    >;
Filter Campaign Data
In the definition of the campaign logic, you specified that it focuses on the voice records only. That means that the data stream can be filtered for voice records before forwarding it to the campaign logic. Additionally the campaign logic focuses only on special types of calls (1 <= callType <= 4 or callType = 6). Therefore, the filter can also extract tuples by the call type and forward them only if the criteria match.
To apply the filter, you insert a filter operator into the ContextDataProcessor composite and feed the composite input data stream into that filter. Download the code from snippet_filter.txt and add it directly behind the graph clause of the ContextDataProcessor composite.
graph

    << Insert code from file snippet_filter.txt here >>

    /**
     * CustomContextLogic
Logic Operator Interfaces
The next step is the customization of the CustomContextLogic operator. The wizard already created this operator as a template. You implement the campaign logic by customizing this operator. Since the campaign logic operates on the output of your filter operator that you introduced in the previous step, you change the input stream to accept the output stream of the filter. Therefore, you change the input stream name InDataStream to the output stream name of the filter operator that is called FilteredInDataStream.
The campaign logic calculates some metrics. Part of the metric information is the total number of CDRs. Thus, it needs also the stream of data that the Filter operator removed. Therefore, it gets the RemovedInDataStream as an input stream.
The campaign logic creates events for threshold1, threshold2, and dropped calls. These events are the output of three extra data streams of the operator. So you add these three streams with the names Threshold1EventStream, Threshold2EventStream, and DroppedCallsEventStream as an output.
The attributes of the streams are as follows:
| Attribute | Why needed by campaign |
|---|---|
| rstring imsi | The IMSI of the subscriber for which the event occurred. |
| rstring day | The date of the day at which the event occurred. |
| uint32 duration | If voice call, the voice call duration. |
| uint32 droppedCalls | If dropped calls, the number of dropped calls. |
To do the modifications, add/change the code of the CustomContextLogic operator:
(
    stream<TypesCommon.ContextCommandRespType> OutCommandRespStream;
    stream<TypesCommon.ContextCheckpointStreamType> OutRecoveryRespStream;
    stream<rstring imsi, rstring day, uint32 duration> Threshold1EventStream;
    stream<rstring imsi, rstring day, uint32 duration> Threshold2EventStream;
    stream<rstring imsi, rstring day, uint32 droppedCalls> DroppedCallsEventStream;
    stream<CampaignMetricsType> CampaignMetricsStream
) as CustomContextLogic = Custom(
    FilteredInDataStream as Data;
    RemovedInDataStream as Removed;
    InCommandStream as Cmd;
    InRecoveryStream as Recovery
) {
    logic
Campaign Logic State Variables
To provide some information about the internal state of the operator (for example, how many CDRs are processed, how many are ignored), the operator provides metrics. You declare some names and variables to hold that data.
To add up the voice minutes and dropped calls per day, the campaign logic needs to store some data. You already defined custom types for this purpose and now you declare some variables based on these types. Since all of this data is stateful for the operator, the variables are declared in the state section.
Download the code for the state section from snippet_campaign_logic_state.txt and insert it directly behind the logic clause of the CustomContextLogic Custom operator in the ContextDataProcessor composite:
) as CustomContextLogic = Custom(
    FilteredInDataStream as Data;
    RemovedInDataStream as Removed;
    InCommandStream as Cmd;
    InRecoveryStream as Recovery
) {
    logic

    << Insert code from file snippet_campaign_logic_state.txt here >>

    onTuple Data: {
Custom Logic
Now it’s time to implement the custom logic. The code is executed when a data tuple arrives. Therefore, it is implemented in the onTuple Data section of the operator. The code template already contains a section that is marked by comments. Here you insert the custom code.
Download the code for the campaign logic from snippet_campaign_logic.txt.
Add the code directly after the custom code begin comment in the onTuple Data section of the CustomContextLogic Custom operator:
onTuple Data : {
    if (true == Data.chainPunct) {
        // ------------------------------------------------
        // custom code begin
        // ------------------------------------------------
        /**
         * send campaign metrics data to CampaignMetricsSink
         */
        submit(metrics, CampaignMetricsStream);
        // ------------------------------------------------
        // custom code end
        // ------------------------------------------------
    } else {
        // ------------------------------------------------
        // custom code begin
        // ------------------------------------------------
        << Insert code from file snippet_campaign_logic.txt here >>
        // ------------------------------------------------
        // custom code end
        // ------------------------------------------------
    }
Since the CustomContextLogic operator receives also the data tuples that are removed by the filter operator as the RemovedInDataStream stream, it processes them.
Add the code for the processing of these tuples as an extra onTuple section.
Therefore, add the following code behind the onTuple code that you already added, but before the onTuple Cmd section like here:
    }
    onTuple Removed : {
        metrics.totalCDRs++;
        if (cdrRecordType == 2ub) {
            metrics.smsCDRs++;
        }
        if (duplicate) {
            metrics.duplicateCDRs++;
    }
    }
    onTuple Cmd : {
        // ------------------------------------------------
        // custom code begin
        // ------------------------------------------------
Checkpointing
The CustomContextLogic operator also handles checkpointing. Therefore, it must process a set of commands that can be received in the onTuple Cmd section.
Download snippet_campaign_cmd_logic.txt and add the code from the snippet in the onTuple Cmd section:
onTuple Cmd : {
    // ------------------------------------------------
    // custom code begin
    // ------------------------------------------------
    << Insert code from file snippet_campaign_cmd_logic.txt here >>
    // ------------------------------------------------
    // custom code end
    // ------------------------------------------------
    submit(Cmd, OutCommandRespStream);
}
Code for checkpointing is also needed in the onTuple Recovery section.
Download it from snippet_campaign_recovery_logic.txt and add it in the onTuple Recovery section:
onTuple Recovery : {
    // ------------------------------------------------
    // custom code begin
    // ------------------------------------------------
    << Insert code from file snippet_campaign_recovery_logic.txt here >>
    // ------------------------------------------------
    // custom code end
    // ------------------------------------------------
}
Since the framework also takes care for checkpointing and recovery, you need to ensure that the right attributes are used in checkpoint files.
You add the required attributes in the ContextCheckpointStreamType.
/**
 * The type of output tuples written to checkpoint files
 * Add here the attributes from the InDataStream that are
 * required to build your custom context.
 * This type is used for InRecoveryStream.
 */
static ContextCheckpointStreamType = tuple<
    // ------------------------------------------------
    // custom code begin
    // ------------------------------------------------
    uint8	cdrRecordType,
    rstring	cdrCallingImsi,
    rstring	cdrCalledImsi,
    rstring	cdrCauseForTermination,
    uint8	cdrCallType,
    uint64	cdrSamMczDuration,
    rstring	cdrCallReferenceTime
    // ------------------------------------------------
    // custom code end
    // ------------------------------------------------
>;
Note:
The framework writes a data file for each input file with the schema given in ContextCheckpointStreamType.
These files are used for recovery and context restore. You have the same schema at the InRecoveryStream (third input port).
For writing the files, the framework extracts the data from the input stream of the custom context.
As a consequence, the ContextCheckpointStreamType must be a subset of the input stream attributes (type and name) and must also include all data that is needed to rebuild the state of the custom context.
Campaign Files and Metrics
Now you care for the outcome of the campaign logic. During the customization, you saw that the campaign logic produces three output streams. These streams contain the event data that is written into files. You use a FileSink operator for each of these streams to write the data into a file.
The ContextDataProcessor composite has a $groupId and a $outputDir parameter. The $groupId parameter holds the group ID for this operator and the $outputDir parameter holds the path to the data output directory. You use these parameters to create unique path and file names.
Example:
file: $outputDir + "/" + $threshold1FileName + "_CDR-" + $groupId + ".csv";
Download the code for the FileSink outputs from snippet_file_sink_output.txt and add the code right before the end of the ContextDataProcessor composite (right before the last ‘}’ in the file).
Add the code submit(metrics, CampaignMetricsStream); after custom code begin in order to update the metrics at the end of the recovery phase.
The last operator that you add to the ContextDataProcessor is the CampaignMetricsSink operator. This operator receives the metrics data tuples from the campaign logic and provides the metrics data to the Streams Runtime. Download the code for the CampaignMetricsSink from snippet_campaign_metrics_sink.txt.
            onPunct Recovery : {
                if (currentPunct() == Sys.WindowMarker) { // end of training phase
                // ------------------------------------------------
                // custom code begin
                // ------------------------------------------------
                // update metrics
                submit(metrics, CampaignMetricsStream);
                // ------------------------------------------------
                // custom code end
                // ------------------------------------------------
                submit(Sys.WindowMarker, OutRecoveryRespStream);
                }
            }
        }

        << Insert code from file snippet_file_sink_output.txt here >>

        << Insert code from file snippet_campaign_metrics_sink.txt here >>

}
Customize the CheckpointFileRemover
In the custom Campaign logic it is checked if the subscriber map has expired data. These entries (data out of interval) are removed from the list in the onTuple Data section of the CustomContextLogic operator. Therefore it is not required to read the checkpoint files and to pass the data to the recovery stream at the housekeeping phase. The housekeeping time is scheduled at midnight (0:00) for each day of the week (See parameters ite.schedule.cleanup.dayOfWeek, ite.cleanup.schedule.hour and ite.cleanup.schedule.minute). The demoapp needs to recover from the checkpoint files at job startup only.
Open teda.demoapp/Resources/demoapp.housekeeping.context.custom/CheckpointFileRemover.spl in the Project Explorer and add the following operator right before the end of the CheckpointFileRemover composite (right before the last ‘}’ in the file:
/**
 * Filenames are forwarded only on startup
 */
(stream<I> KeptFiles as O) as KeptFilesFilter = Custom(KeptFilesStream as I)
{
    logic
    state:
    {
        // Forward tuples only for the first batch, which ends with
        // the first punctuation.
        mutable boolean forwardTuples = true;
    }
    onTuple I:
    {
        if (forwardTuples) {
            submit (I, O);
        }
    }
    onPunct I:
    {
        if (currentPunct() == Sys.WindowMarker) {
            forwardTuples = false;
            submit(Sys.WindowMarker, O);
        }
    }
}
In the Splitter operator you need to rename the output stream name from KeptFiles to KeptFilesStream.
/**
 * The first file that arrives, triggers the calculation of "now".
 * Take this time information to split the stream into good and
 * too old files.
 */
(stream<I> KeptFilesStream as G; stream<I> TooOld as B) as Splitter = Filter(ExistingFiles as I)
{
Building and starting the ITE application
After restructuring the project, it is best practice to clean the project before starting a new build process. To do so, select on the Streams Studio main menu Project > Clean… and select the teda.demoapp project. Press OK.
You need to do the same steps as in Module 7: Starting the applications to launch the applications and to process the input files.
Note:
If your Lookup Manager is still running and the lookup data was loaded already before, then you can launch the ITE application and trigger the restart command in the control directory. In this case the init command does not need to be processed again in order to synchronize the Lookup Manager and ITE applications.
Change into <WORKSPACE>/teda.lookupmgr/data/control directory and create the appl.ctl.cmd file with content of the
desired command, in our case: restart,demoapp.
cd <WORKSPACE>/teda.lookupmgr/data/control
echo 'restart,demoapp' > appl.ctl.cmd
ITE application and Lookup Manager application will establish a control sequence where at the end both applications are in RUN state using the data already available, without reload.
Discussing the results
Refresh and expand the data/out folder of the ITE application after processing the input files. You find some files with campaign output there:
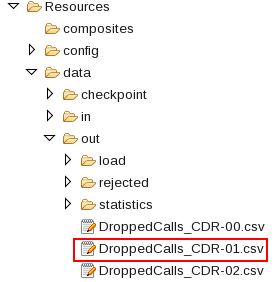
According to the name pattern that you specified, you have here the files with the dropped calls information.
The content looks like:
"41400000000034","01.02.2014",5
"41400000001034","02.02.2014",5
"41400000002034","03.02.2014",5
According to the DroppedCallsEventStream each line contains the values for IMSI, date and nummber of dropped calls.
The other files in the data/out folder are the Threshold output files, like Threshold1_CDR-00.csv.
The content looks like:
"41400000000034","01.02.2014",922
"41400000001034","02.02.2014",921
"41400000002034","03.02.2014",918
Each line contains the values for IMSI, date and duration of the voice calls in minutes.
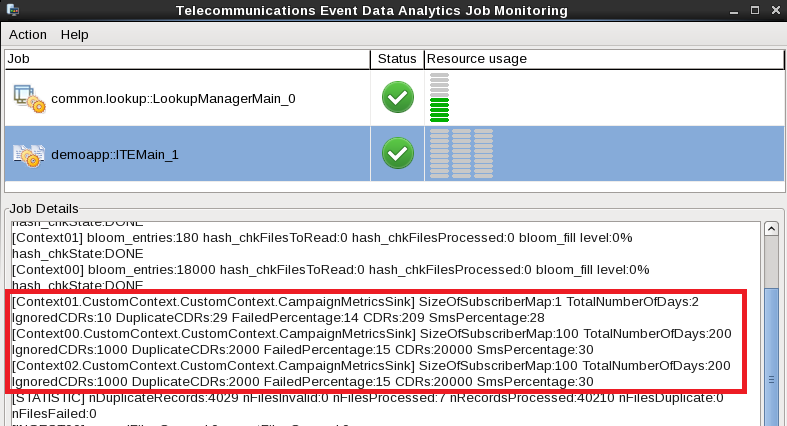
In the Monitoring GUI you can see the custom metrics for each group.
Next steps
In the next module, you change the format of output files for database tables.