Module 7 - Enrich your data by using lookups on external data
Edit meObjectives
In this module, you extend the ITE application that you created while following the instructions of the modules 1 - 4 and optionally 5 and 6. You enrich the data by using lookups from external data. You introduce a new type of an application, which manages the external data, and you learn how it interacts with the ITE application.
Regarding the business logic, you learn how to deal with error situations for example in case a Call Detail Record (CDR) cannot be correlated with the external data.
At the end of this module, you have a scalable Streams application that processes CDRs for SMS and voice calls. It transforms the data, enriches it with data from an external source, and writes the results into output files in CSV format.
After completing this module you should be able to:
- Create and customize the LookupManager application
- Configure the dependency of ITE application on the Lookup Manager
- Extend the stream schema for the enrichment in the ITE application
- Add the enrichment operation to the business logic in the ITE application
Prerequisites
You finished at least module 4 of the tutorial, in which you customized a transformer for the CDRs. You can also continue after module 5 or module 6, where you added support for other types of input files.
If you continue after module 4, you are able to process only CSV files at the end of this module, otherwise you can also use binary or ASN.1 coded input data to verify your application.
Concepts
Imagine that the CDRs must be enriched with customer data, which is typically stored in a customer relationship management system (CRM system). The obvious solution that uses lookups on a database is too slow to fulfil your throughput requirements.
A second option is to hold the enrichment data in the processing element’s memory, but this method can require to hold the data multiple times, which is only feasible for a small amount of data.
The TEDA framework offers the option to use shared memory. That means the enrichment data is stored in shared memory, so that all processing elements on the same host can access the data. For deployment scenarios with multiple hosts, the Lookup Manager application takes care of creating and updating the shared memory on all hosts.
You create and customize a new application, the Lookup Manager. It is responsible for loading and updating the external enrichment data in memory and distributing it across hosts.
A solution can contain one or more ITE applications, and optionally one Lookup Manager application.
Control files in the Control Path are the interface between the Lookup Manager application and the ITE applications.
The Lookup Manager application uses this interface to stop the file processing in the ITE applications during the update of the lookup repositories and to resume the file processing after the enrichment data is loaded.
This synchronization is done to ensure consistent lookup data during processing of each input file.
Requirements of the enrichment
The CDRs must be enriched by a customer ID and a customer type, which are derived from the calling or called IMSI, dependent on the call type.
- If the call type is 0, use the called IMSI, otherwise the calling IMSI for enrichment
- If the enrichment fails, reject the CDR by using a specific reject reason
Assumptions regarding the external data and its interface
The customer information is available in the network operators Master Data Management system (MDM). The MDM system exports the data that is required for enrichment into a CSV file regularly.
The name of this file is IMSI_CRM.csv and the sequence of columns is:
- IMSI
- customer ID
- customer type.
The file has no header, and the separator is a comma.
41400000000000,0,2
41400000000001,1,3
41400000000002,2,6
41400000000003,3,5
41400000000004,4,3
41400000000005,5,7
...
Customization Points
The following figure and table show the points that you need to customize in the ITE application during this module or that influence the customization like the different formats and stream schemas. Other parts don’t need to be customized because it is not necessary for this module.
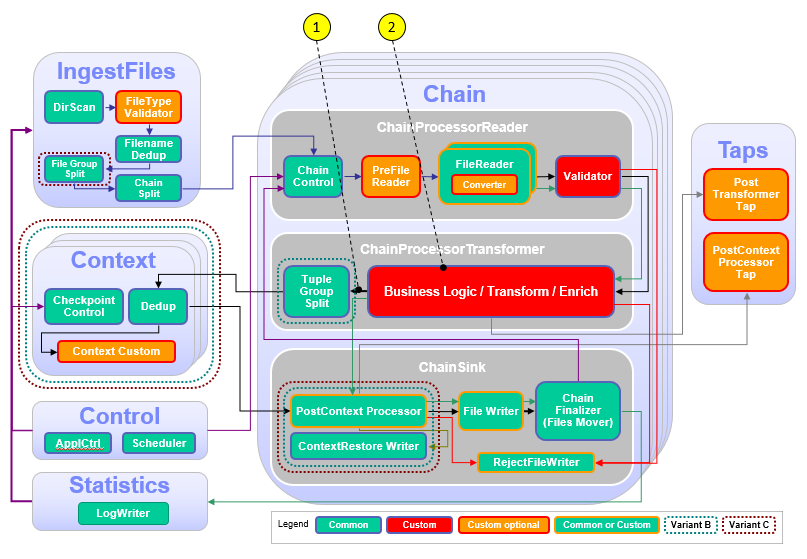
| Number | Functional Block | What needs to be customized? |
|---|---|---|
| 1 | ChainProcessor Transformer | Extend the SPL schema of the transformer output and file writer streams with the attributes for customer ID and customer type. |
| 2 | Business Logic, Transform, Enrich | Add the lookup and enrichment operations to the business logic. |
Configuration
You do all configuration settings in the same manner as you did it in the previous modules. Expand teda.demoapp/Resources/config in the Streams Studios Project Explorer and open the config.cfg file. In all later steps, this opened file is referenced when talking about config.cfg.
The Lookup Manager application also has a config.cfg, but you do the important adaptations in the WORKSPACE/teda.lookupmgr/LookupMgrCustomizing.xml file.
Tasks
The configuration and customization consists of the following tasks:
- Creating the Lookup Manager SPL project
- Customizing the Lookup Manager application
- Configuring the dependency of ITE application on the Lookup Manager
- Extending the stream schema for the enrichment
- Adding the enrichment operation to the business logic
Creating the Lookup Manager SPL project
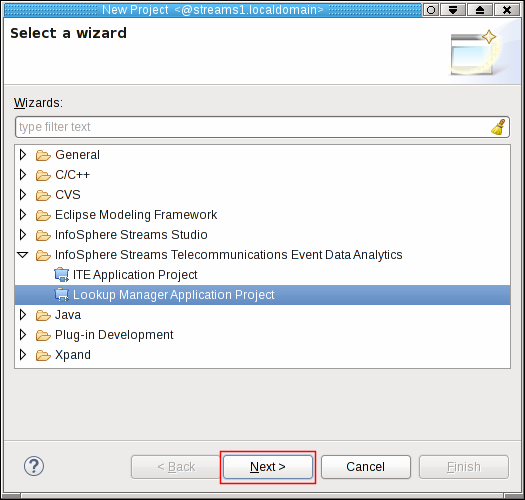
Open your Streams Studio and go to File > New > Project…. Scroll down to InfoSphere Streams Telecommunications Event Data Analytics, and open this entry. Streams Studio presents two different project options: ITE Application Project, and Lookup Manager Application Project.
Select the Lookup Manager Application Project and click Next >.
The Lookup Manager Application Project dialog opens. Here you initially configure the new SPL project.
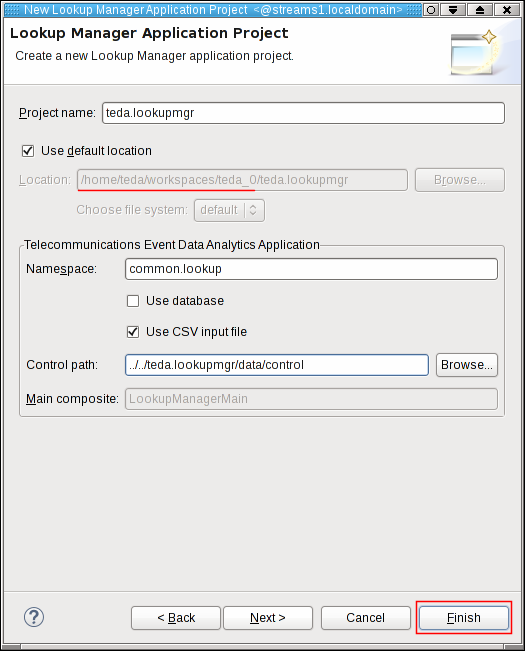
Enter teda.lookupmgr as project name. This name becomes a part of the default location where the project is stored. Keep Use default location checked. Then, your project is created within the workspace directory (red underlined). Your workspace directory is most likely different than in the previous figure.
Enter common.lookup as the namespace. This namespace becomes the most-outer SPL namespace of the Lookup Manager application. Leave the Use CSV input file check box checked. Enter ../../teda.lookupmgr/data/control into the Control path field.
Click Finish.
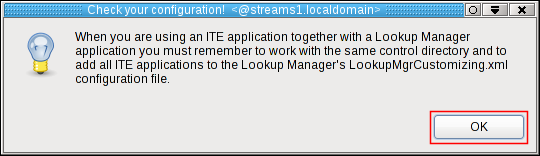
A dialog showing a hint opens. Close this dialog or click OK. Later you change the control directory of your ITE application so that the Lookup Manager application and your ITE application use a common control directory.
The SPL project teda.lookupmgr is created and automatically built. The build process takes some time.
Customizing the Lookup Manager application
The Lookup Manager application controls the lookup data and the ITE applications that access this data. When the Lookup Manager needs to update the data, it instructs the ITE applications to pause their work. After the update of the lookup data, the ITE applications are triggered to continue.
The Lookup Manager application is configurable through a configuration file config.cfg.
You can find this file in the config directory of the Lookup Manager SPL project, here WORKSPACE/teda.lookupmgr/config.
The wizard already created all required settings for you. The more important file for customizing the Lookup Manager application is WORKSPACE/teda.lookupmgr/LookupMgrCustomizing.xml file.
In this file, you define shared memory segments, stores, streams schemas, and the mapping from the enrichment data source to the SPL streams schemas. When you compile the Lookup Manager application, the content of the LookupMgrCustomizing.xml file is used to generate parts of its SPL source code.
You find more information about customizing the Lookup Manager application in the IBM Knowledge Center under Reference>Toolkits>SPL standard and specialized toolkits>com.ibm.streams.teda 2.0.0>Developing applications>Customizing applications>Customizing the Lookup Manager application.
You customize the following part:
- Specify the
DataSourcesthat the ITE application uses. TheDataSourcerepresents the structure of the tuple that is provided by the lookup data source. The source is a database or a comma-separated file (.csv). You must enter the name that matches the name of the input file without the.csvextension. Remember, the file name isIMSI_CRM.csv. Therefore, theDataSourcename for your ITE application is IMSI_CRM. (In other projects you can have more than one ITE application. An ITE application can use more than one memory segments.) - Define the source tuple attributes for each
DataSource. TheValueDefinitiondescribes the tuple attribute name and the SPL data type. TheIndexInInputFileattribute is valid for the file as the source. It specifies the column in the file, where the data is located. The mapping to the database output is defined by theDbAccessSpecificationattribute of theDataSourceelement. In the tutorial, you have three attributes in theIMSI_CRM.csvfile. - Declare the
Segmentsthat the ITE application can read. Each segment defines the physical name of the shared memory object that assigns oneDataSourcedefinition. The maximal reserved size of the shared memory segment is required as well as the memory size unit. The tutorial provides data for only one segmentDemoApp segment that uses 1200 MB memory by the IMSI_CRM data source. - Specify the
Storesassigned to the segment. Each segment supports one or more key-value store definitions. Here, you must define the value of the ImsiMap store that includes a tuple structure of two attributes customerId and customerType. The value of the imsi source attribute is the key that defines the unique set of data to be stored in the shared memory.
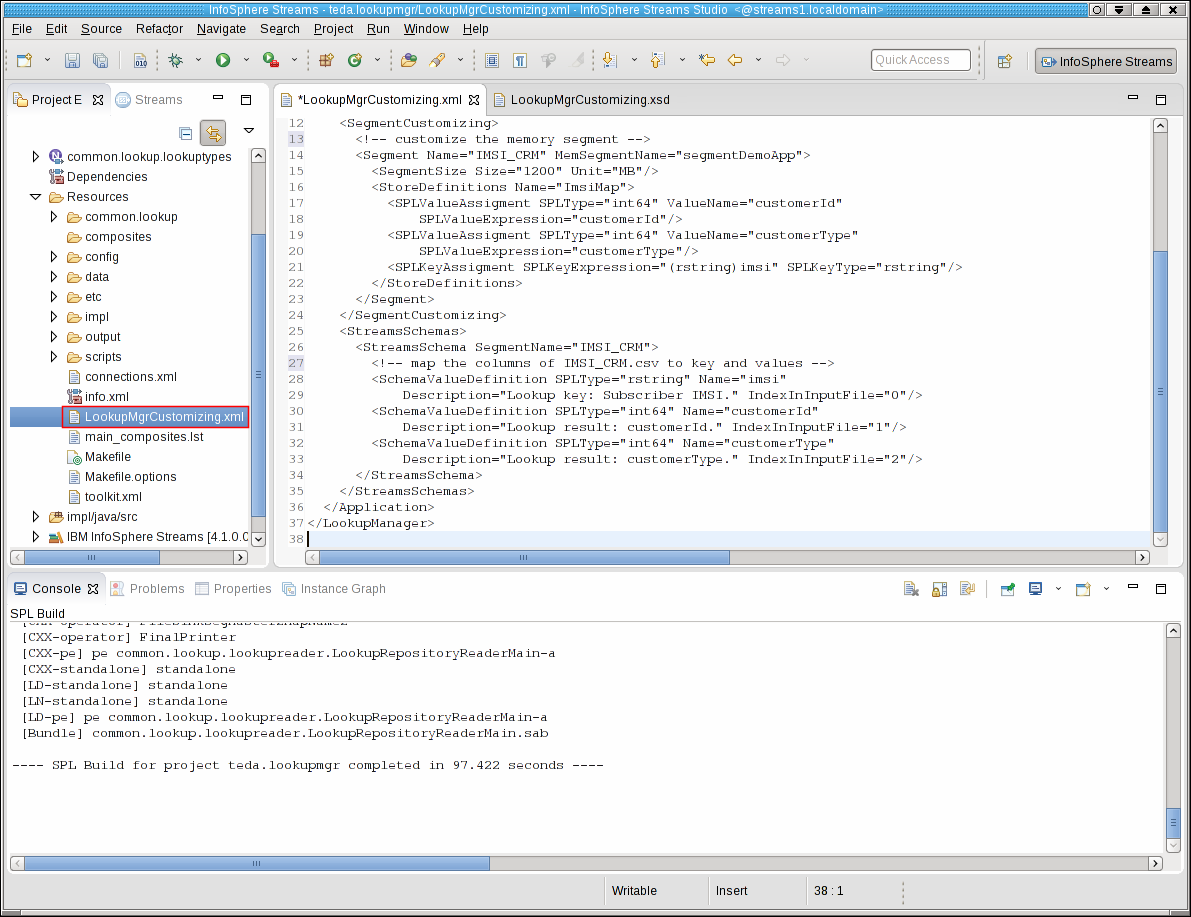
Open the teda.lookupmgr/Resources/LookupMgrCustomizing.xml file of the SPL project teda.lookupmgr, and replace the sample content by the following lines.
<LookupManager xmlns="http://www.ibm.com/xmlns/prod/streams/teda" xmlns:xsi="http://www.w3.org/2001/XMLSchema-instance" xmlns:teda="http://www.ibm.com/xmlns/prod/streams/teda" SchemaVersion="2.0" xsi:schemaLocation="http://www.ibm.com/xmlns/prod/streams/teda etc/LookupMgrCustomizing.xsd">
  <DataSources>
    <!--Indexing begins with 0-->
    <DataSource Name="IMSI_CRM">
      <ValueDefinition SPLType="rstring" Name="imsi" Description="Lookup key: Subscriber IMSI." IndexInInputFile="0"/>
      <ValueDefinition SPLType="int64" Name="customerId" Description="Lookup result: customerId." IndexInInputFile="1"/>
      <ValueDefinition SPLType="int64" Name="customerType" Description="Lookup result: customerType." IndexInInputFile="2"/>
    </DataSource>
  </DataSources>
  <Segments>
    <Segment Name="segmentDemoApp" DataSource="IMSI_CRM" Size="1200" Unit="MB">
      <Stores>
        <Store Name="ImsiMap">
          <ValueAssignment SPLType="int64" Name="customerId" SPLExpression="customerId"/>
          <ValueAssignment SPLType="int64" Name="customerType" SPLExpression="customerType"/>
          <KeyAssignment SPLType="rstring" SPLExpression="(rstring)imsi"/>
        </Store>
      </Stores>
      <Applications>
        <Application Namespace="demoapp"/>
      </Applications>
    </Segment>
  </Segments>
</LookupManager>
For more information about the allowed elements and values in the customization file, see the etc/LookupMgrCustomizing.xsd XSD file in your project directory.
You finished customizing the Lookup Manager application. You can build the project now.
To build the Lookup Manager application project, right-click the teda.lookupmgr project and select Build Project from the context menu.
Configuring the dependency of ITE application on the Lookup Manager
If the ITE application uses the lookup function, the Lookup Manager must control it to ensure data consistency. You must configure the dependency of the ITE application on the Lookup Manager. Remember that you configured the control path for the Lookup Manager application when you created the project. Specify the same path for the ITE application and enable control by the Lookup Manager.
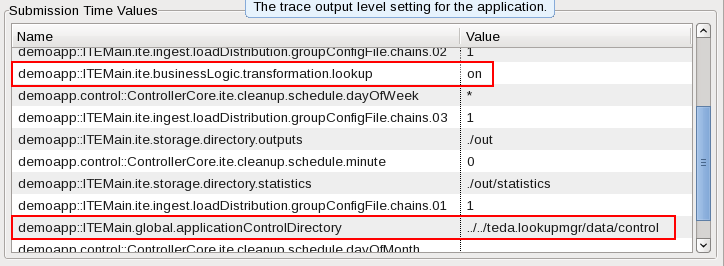
Open the teda.demoapp/Resources/config/config.cfg file of the teda.demoapp project and change the values of the following parameters to the shown values:
global.applicationControlDirectory=../../teda.lookupmgr/data/control
ite.businessLogic.transformation.lookup=on
Extending the stream schema for the enrichment
For the results of the lookup, you need extra attributes in the transformer output stream and in the input stream to the FileSink operators. You define the additional attributes in the SPL type TypesCustom.LookupType.
Open the teda.demoapp/Resources/demoapp.streams.custom/TypesCustom.spl file under the teda.demoapp project and modify the definition of LookupType:
static LookupType = tuple<
    // ------------------------------------------------
    // custom code begin
    // ------------------------------------------------
    // add your custom attributes here
    int64 customerID,
    int64 customerType,
    rstring lookupImsi,
    boolean lookupFound     // lookup success indicator
    // ------------------------------------------------
    // custom code end
    // ------------------------------------------------
>;
The customerID and customerType attributes contain the results of the lookup.
The lookupImsi attribute represents the key that is used to lookup the customer ID and the customer type.
The key must be an attribute of the input stream. Dependent on the callType attribute you use the calling IMSI or the called IMSI as the key. The LookupFound attribute indicates the success of the lookup operation. To include these attributes already into the input stream to the transformer, you enable the schema extension in the config.cfg file:
ite.ingest.reader.schemaExtensionForLookup=on
Note:
ite.ingest.reader.schemaExtensionForLookup=on is the default setting for this parameter. You turned off the parameter when you examined module 3 of the tutorial. This setting makes the application framework add the attributes from LookupType to the common file reader output schema.
To include the additional attributes in the output stream of the transformer and to the CSV output files, you modify the TypesCustom.TransformedRecord and TypesCustom.ChainSinkType SPL types.
Add the LookupType to both SPL type definitions in the teda.demoapp/Resources/demoapp.streams.custom/TypesCustom.spl file in the teda.demoapp project:
static TransformedRecord= tuple<
    // ------------------------------------------------
    // custom code begin
    // ------------------------------------------------
    // add /replace with your custom attributes here
    ReaderRecordType
    ,LookupType
    // ------------------------------------------------
    // custom code end
    // ------------------------------------------------
>;

static ChainSinkType = tuple<
    // ------------------------------------------------
    // custom code begin
    // ------------------------------------------------
    ReaderRecordType
    ,LookupType
    // ------------------------------------------------
    // custom code end
    // ------------------------------------------------
>;
Adding the enrichment operation to the business logic
In module 4 of the tutorial, you implemented a transformer logic in the DataProcessor composite operator, which belongs to the SPL namespace demoapp.chainprocessor.transformer.custom.
Now, you add the following functions to the business logic:
- Derive the lookup key from the called or calling IMSI dependent on the call type. You add this function to the logic of the existing Transform operator.
- Perform the lookup. You add the LookupCache operator to the composite. The LookupCache operator is part of the application framework.
- Evaluate the success of the lookup and add tuples to the rejected output stream if the lookup failed.
- Update the statistics tuple with the number of failed lookups.
The LookupCache operator must be configured with an SPL type that represents the value in the lookup data. Remember, that the lookup data is organized as a map with a key and a value. The value typically consists of multiple attributes.
You define this tuple type as a static SPL type in the TypesCustom composite. Open the teda.demoapp/Resources/demoapp.streams.custom/TypesCustom.spl file in the teda.demoapp project and add the type definition for ImsiLookupTableType:
static ImsiLookupTableType = tuple<
    int64 customerID,
    int64 customerType
>;
Note:
The definition of the ImsiLookupTableType has two constraints:
-
The attribute types and their order must be the same as for the values in the store definition that you specified in the
LookupMgrCustomizing.xmlfile. In this XML file you specified the types and order of the values of the lookup data:<Store Name="ImsiMap"> <ValueAssignment SPLType="int64" Name="customerId" SPLExpression="customerId"/> <ValueAssignment SPLType="int64" Name="customerType" SPLExpression="customerType"/> <KeyAssignment SPLType="rstring" SPLExpression="(rstring)imsi"/> </Store>Therefore, the SPL type ImsiLookupTableType must have as first attribute an int64, which represents the customer ID. The next attribute must also be an int64, which is the customer type. The attribute names can differ from the definition in the XML file, for example, be in different case.
-
The attribute types and names of ImsiLookupTableType must match those attributes of the input stream that contain the lookup results. This condition is the same condition that must be met for the assignFrom SPL function to succeed. Remember, that the input stream schema is extended by LookupType, which is defined as
 static LookupType = tuple<
     // ------------------------------------------------
     // custom code begin
     // ------------------------------------------------
     // add your custom attributes here
     int64 customerID,
     int64 customerType,
     rstring lookupImsi,
     boolean lookupFound     // lookup success indicator
     // ------------------------------------------------
     // custom code end
     // ------------------------------------------------
 >;
The customerID and customerType attributes in the LookupType have the same SPL type and the same name as those values in ImsiLookupTable. The order of attributes in the input stream schema can be different from the ImsiLookupTableType.
For the records that the business logic rejects, you add a new reject reason, rrLookupFailed. Add this new value to the rejectReason enum in the teda.demoapp/Resources/demoapp.streams.custom/TypesCustom.spl file under the teda.demoapp project:
static rejectReason = enum {
    rrDefault,
    rrInvalidLine,
    rrRecordDuplicate,
    rrTableDuplicate
    // ------------------------------------------------
    // custom code begin
    // ------------------------------------------------
    ,rrLookupFailed
    // add custom reject codes here
    // ------------------------------------------------
    // custom code end
    // ------------------------------------------------
};
Have a look at the processing graph of the evolved DataProcessor composite before you copy and paste its SPL code into your development environment.
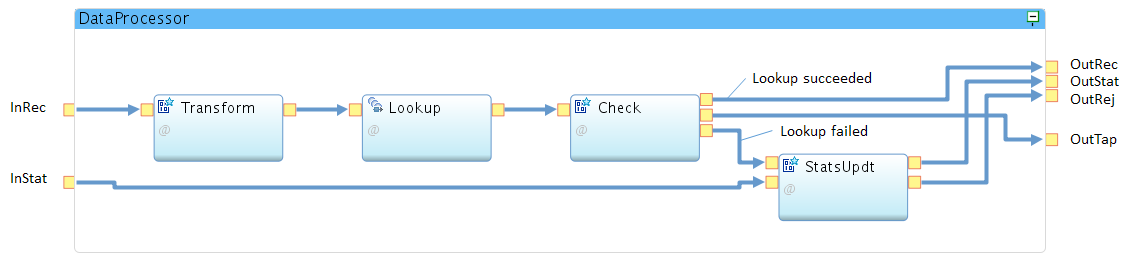
Compared with module 4 of the tutorial, the operator graph now consists of four operators, which are explained from left to right.
The Transform operator implements the same attribute transformations as implemented in module 4. In addition, it derives the key for the lookup from either called or calling IMSI. This attribute derivation is the only modification, which is added to the function of that operator. The functions to forward the incoming statistics tuple and serving the composite output ports are moved to the StatsUpdt operator.
The Lookup operator implements the enrichment of the tuples with the customer ID and the customer type. The operator type is LookupCache, which is available in the namespace demoapp.lookup within the application framework. The Lookup operator indicates its success by setting the stream attribute lookupFound to either true or false.
The Check operator evaluates the lookupFound attribute of the tuples. Tuples, in which lookupFound is true, are forwarded to the composite output port OutRec. If lookupFound is false, the operator creates a tuple with reject information, which is sent to the statistics updater StatsUpdt.
Note, that the composite output port OutTap is also connected with the Check operator. However, the operator never sends data or window markers to this output port because the Post Transformer Tap is disabled by default (ite.businessLogic.transformation.tap = off).
As the main function, the StatsUpdt operator updates the incoming statistics tuple from the InStat port with the number of lookup failures. It takes the rejected tuples, counts them and forwards them to the OutRej output port. Reception of window marker on the rejected data stream (end of file condition) and reception of the statistics tuple can happen in any sequence. When the operator receives a window marker (end of file) on the rejected data stream, it can update the rejectedInvalids counter of the statistics tuple and forward it to the OutStat output port when this tuple is received. If the statistics tuple is received before the window marker, the StatsUpdt operator must buffer the received statistics tuple until the window marker is received to ensure that all rejected tuples are counted.
Note:
The application framework generates a statistics tuple for every processed file and sends it to the transformer composite of the ITE application. The transformer composite can update it, but is required to forward it.
Open the DataProcessor composite under the SPL namespace demoapp.chainprocessor.transformer.custom and replace the content of the DataProcessor.spl file with the following code.
Building the ITE application
To build the ITE application project, right-click the teda.demoapp project and select Build Project from the context menu.
Preparing the external data
As mentioned before, the Lookup Manager application initializes and updates the data that is used for enrichment by the ITE application. The directory where the Lookup Manager expects the input file, can be configured with a submission time parameter. The default directory is the data directory of the teda.lookupmgr project.
Open a console window and copy the IMSI_CRM.csv file from the sample directory of your Streams installation into the data directory of the Lookup Manager project:
cd WORKSPACE/teda.lookupmgr/data
cp $STREAMS_INSTALL/samples/com.ibm.streams.teda/demo/teda_tutorial/teda.lookupmgr/data/IMSI_CRM.csv .
Starting the applications
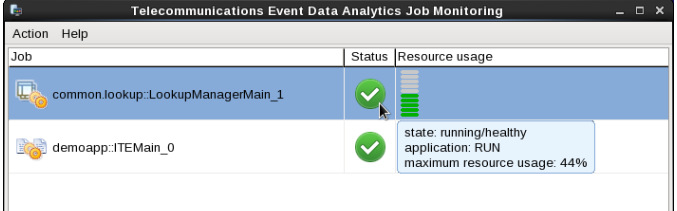
- Ensure that the Streams Domain and Streams Instance are running. Start the Monitoring GUI.
- Start the Lookup Manager application as Distributed to a running instance.
- Start the ITE application as Distributed to a running instance. Verify and adjust submission time parameters demoapp::ITEMain.global.applicationControlDirectory and demoapp::ITEMain.ite.businessLogic.transformation.lookup if the launch configuration was saved before.
Note:
If you restarted the domain, the port number of the sws service can be different. You get the port number by running the streamtool geturl command. Update the port number in the Monitoring GUI. Open Action > Settings… in the main menu. Select the current connection in the Connections tab and edit the port number.
Loading the lookup data
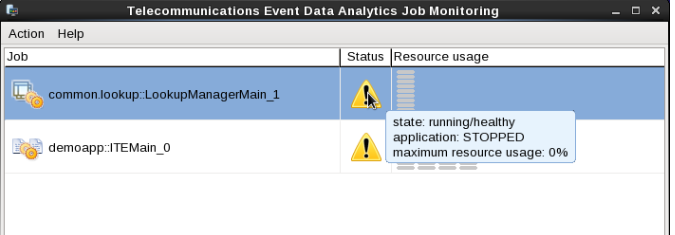
When you look at the Monitoring GUI, you can see that both applications are in state STOPPED after some time. The reason for STOPPED state is that the lookup data is not loaded.
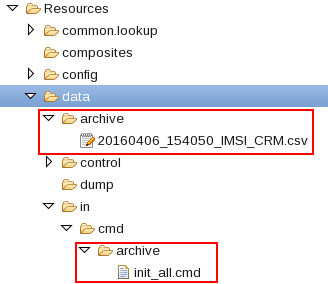
Now you instruct the Lookup Manager to load the lookup data. The Lookup Manager has a file-based command interface for this purpose. It reads command files from its command input directory (teda.lookupmgr/data/in/cmd). These files can exist because of being needed often or can be created just in time. With the following file, you instruct the Lookup Manager to initialize all segments for all application it knows. The syntax is:
command;segment.
If segment is missing, it means all segments. The init command loads data from an appropriate file and clears the belonging segment before writing. An update adds or overwrites data in existing segments. The Lookup Manager now loads the data files for its segments as configured during build. In this tutorial, you have only IMSI_CRM. Remember that the segment name and data file name (without extension .csv) must be the same.
You run the following commands:
cd <WORKSPACE>/teda.lookupmgr/data/in/cmd
echo 'init;' > init_all.cmd
In the Monitoring GUI you can see that the resources of common.lookup::LookupManagerMain are filled. When loading is finished both applications go into RUN state.
Both, the command file and the lookup data file were moved to their archive folders.
Now the ITEMain application is able to process files in its input directory WORKSPACE/teda.demoapp/data/in.
Process the data files again as you did it in module 3, 4, 5 or 6.
Discussing the results
Refresh and expand the data/out/load folder of the ITE application after processing the input files. You find some processing result files there:
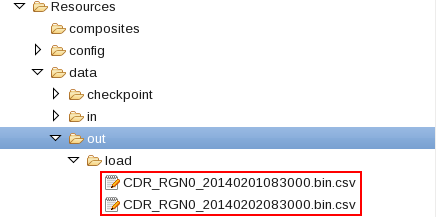
Open one or more of the result files. A CSV line of these files looks like:
1,1,4131002400,41400000000034,21436500000041,196105000045,31050094999975,21436549999961,5,5,186102999954,00A1,0004,00000010,3,26,6,5,2014-02-01 08:30:00,1268,2014-02-01,08:30:00,34,1,41400000000034,true
The last four values of each line represent your lookup values (customerID, customerType, lookupImsi, lookupFound). The last true indicates that the lookup was successful.
If a lookup fails, the record is not processed. An error information line is added to the rejected data output file.
Optionally, you can process the following input file to see a record rejected because lookup fails:
Refresh and expand the data/out/rejected folder of the ITE application. You find some files with rejection information there:
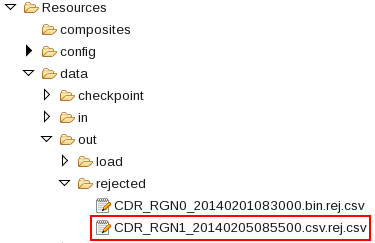
The file name indicates which file the rejected duplicated data come from. It is the same name as the input file extended by .rej.csv.
The file for example starts with:
4,Lookup failed for IMSI: 41409999999999,3
The first value of each CSV line is the reject reason. The value 4 stands your previously added reject reason rrLookupFailed. The second value is a comment. The third value in each of these CSV lines indicates the record number of record in the input file.
You can find a summary of the rejected records in the statistics file in the data/out/statistics folder of the ITE application.
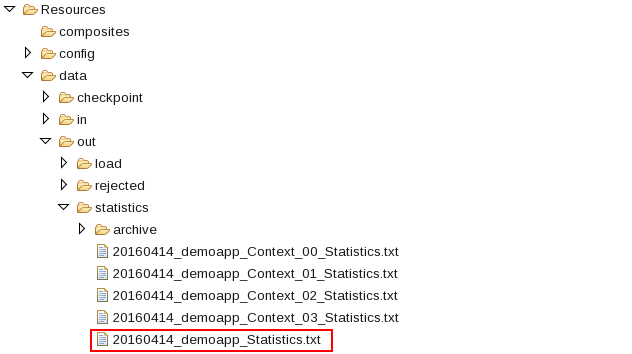
The statistics file has one CSV line per processed input file. The line can look like:
CDR_RGN1_20140205085500.csv",fileType="CSV",filesize=1830,… <some more data> …,rejectedInvalids=1,recordDuplicates=2,… <some more data>
The “rejectedInvalids=1” indicate that one lookup failed.
Shutting down the applications and cleaning up
Typically, you use the teda-shutdown-job jobIds command to shut down an ITE or Lookup Manager application gracefully. In preparation for the next module of the tutorial, or to repeat the processing, you can also use streamtool or Streams Studio to cancel the job. For the next steps, or if you want to repeat this module, you must remove the history of the file name deduplication, which is stored in files in the checkpoint directory. It is also recommended to clean up the control and out directories.
- Cancel ITE job and Lookup Manager job
- Remove the checkpoint, control and out directories and all its content (remember that the control folder is now under Lookup Manager’s data directory).
You can remove them from Streams Studio or command line:
cd WORKSPACE/teda.demoapp/data
rm -rv checkpoint out
cd WORKSPACE/teda.lookupmgr/data
rm -rv control out
Optionally, you can close the Monitoring GUI.
Next Steps
In the next module you add record deduplication in the ITE application.