Module 2 - Creating, running, and monitoring the basic mediation application
Edit meObjectives
The Telecommunications Event Data Analytics (TEDA) application framework provides Streams Studio wizards to create Streams mediation applications as SPL projects. You configure these applications with configuration parameters that are stored in a simple text file, and customize them by adding your business logic or near real-time analytics to already prepared SPL composite operators.
The tasks that the Streams Studio wizards perform can also run on the command line using the teda-create-project script, which is described in the IBM Knowledge Center: Reference > Toolkits > SPL standard and specialized toolkits > com.ibm.streams.teda > Developing applications > Creating applications > Creating applications with the command line. The tutorial focuses on the Streams Studio.
After completing this module you should be able to:
- Create a TEDA-based Streams application using the Streams Studio’s ITE Application Project wizard
- Build the TEDA-based SPL project
- Run the TEDA-based SPL project
- Move data files that the running TEDA-based Streams job processes, to the appropriate input directory
- Monitor the running TEDA-based Streams job using the Monitoring GUI
- Shut down the running TEDA-based Streams job gracefully
Prerequisites
You completed module 1, which guided you through the installation of the TEDA plug-in for Streams Studio and the setup and configuration of the Monitoring GUI.
If you imported the sample application that comes as SPL Sample with the com.ibm.streams.teda toolkit, in module 1, you must create a new workspace for Streams Studio to avoid that the new project conflicts with the imported sample application.
Concepts
TEDA-based SPL projects come with sample implementations and data files, so you can immediately compile and run your application.
The TEDA application framework has two built-in application types.
-
The ITE application (ITE stands for Ingest, Transform, and Enrich) is responsible for processing input files, including parsing, validating, transforming, enriching, and correlating records.
-
The Lookup Manager application is responsible for loading and updating the enrichment data in memory and distributing it across hosts.
A mediation solution can contain one or more ITE applications, and optionally one Lookup Manager application if enrichment from external data sources like Customer Relation Management (CRM) systems is required. You can read more about the architecture in the IBM Knowledge Center under Reference > Toolkits > SPL standard and specialized toolkits > com.ibm.streams.teda > Application framework > Architecture.
This module focuses on the ITE application.
Tasks
The following tasks are performed:
- Creating an ITE application project
- Building the ITE application project
- Running and monitoring the ITE application
- Moving sample data files to the application’s input directory to process the data
- Shutting down the ITE application gracefully
Creating an ITE application project
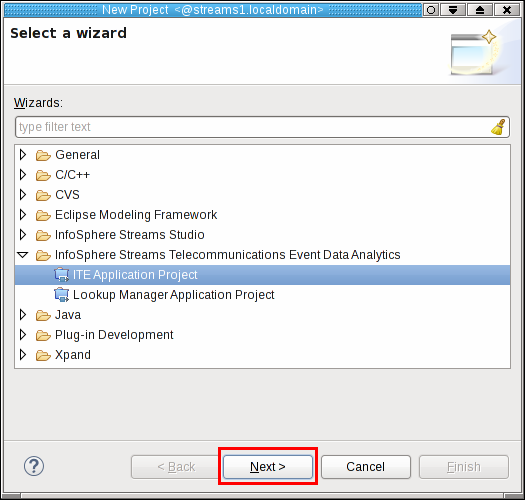
Open your Streams Studio and go to File > New > Project…. Scroll down to InfoSphere Streams Telecommunications Event Data Analytics, and open this entry. Streams Studio presents two different project options: ITE Application Project, and Lookup Manager Application Project. Select ITE Application Project and click Next >.
The New ITE application project dialog opens. Here you can initially configure your Streams application and where it is stored.

Enter teda.demoapp as project name. This name becomes a part of the default location where the project is stored. Keep Use default location checked. Then, your project is created within the workspace directory (red underlined). Your workspace directory is most likely different than in the previous figure. Throughout the complete tutorial, this path is referred to as the workspace directory or simply as the workspace.
Select Variant A for your first ITE application. This variant is a simple file-to-file processing. You can find more information about the different variants in the IBM Knowledge Center under Reference > Toolkits > SPL standard and specialized toolkits > com.ibm.streams.teda > Application framework > Architecture > ITE application > Variants.
Enter demoapp as the namespace. This namespace becomes the most-outer SPL namespace of the ITE application. Leave the Use Lookup Manager switch unchecked. The ITE application that you create in the first step does not use lookup data, which needs to be managed. Also, keep the default value for the control path.
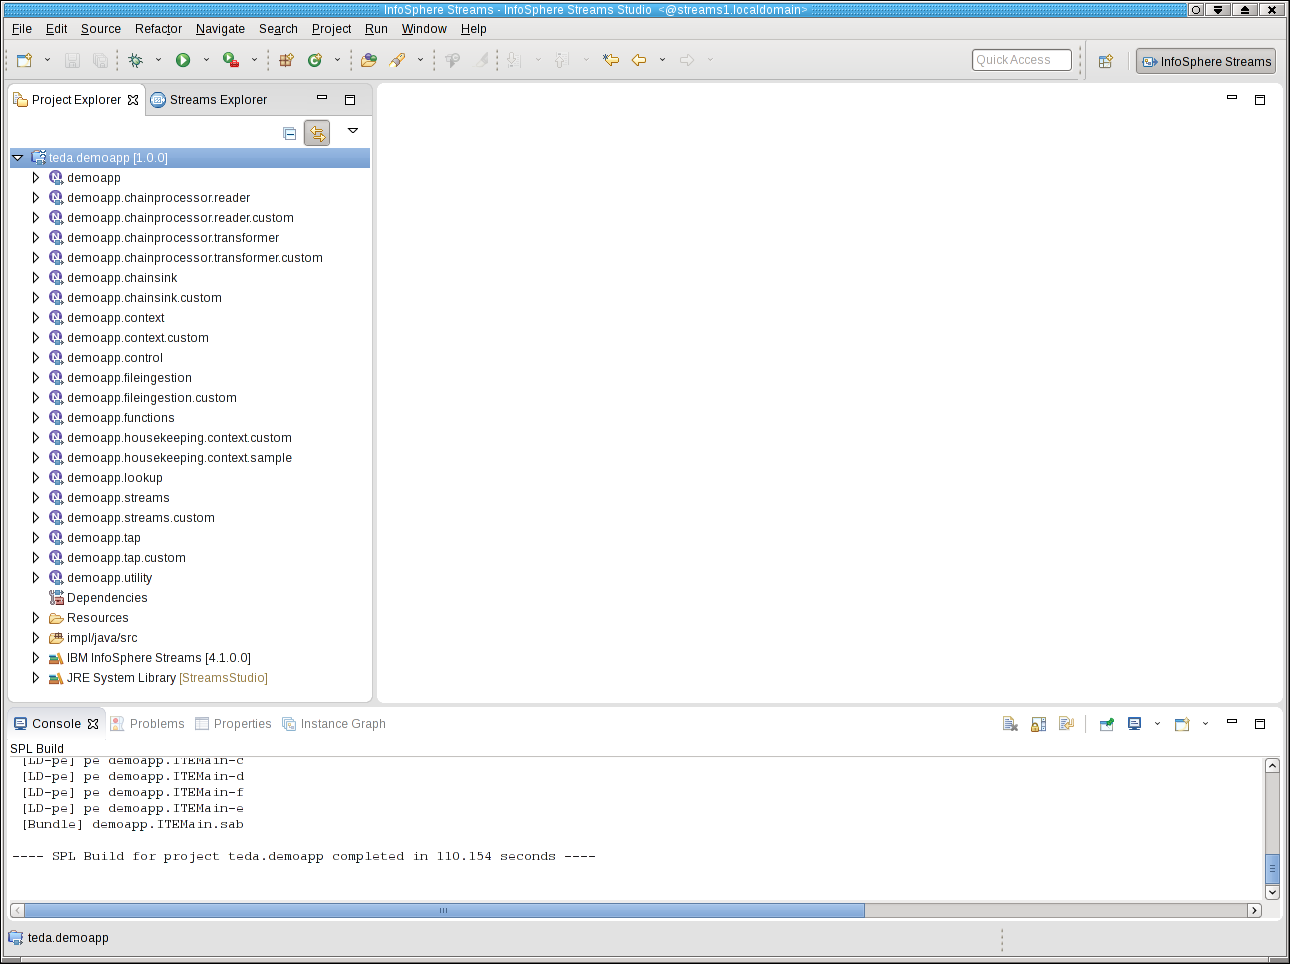
Click Finish. The teda.demoapp SPL project is created and automatically built. The build process takes some time.
Building the ITE application project
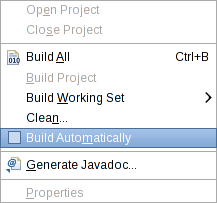
First, you should disable automatic builds in your Streams Studio. This setting avoids that the external builder builds the application after every change. Uncheck the menu item Project > Build Automatically.
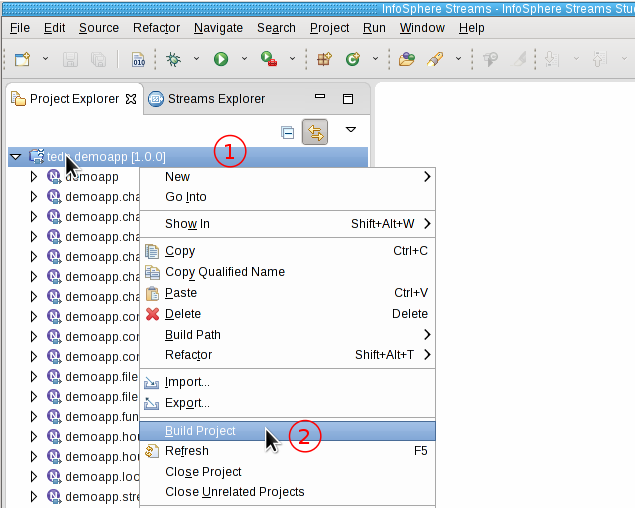
When you customize your application later, you can build the application from Streams Studio from the Project menu by selecting Build Project. You can also right-click at the project teda.demoapp in the Project Explorer, and select Build Project from the pop-up menu.
Running and monitoring the ITE application
The Main composite of the ITE application has the name ITEMain. You find it in the Project Explorer under the demoapp namespace. However, before you can start the application you must start the Streams instance.
To submit the application to a Streams runtime, navigate to the Project Explorer.
Note: It is required to launch the ITE application as Distributed to a running instance. Do not launch the ITE application as Standalone.
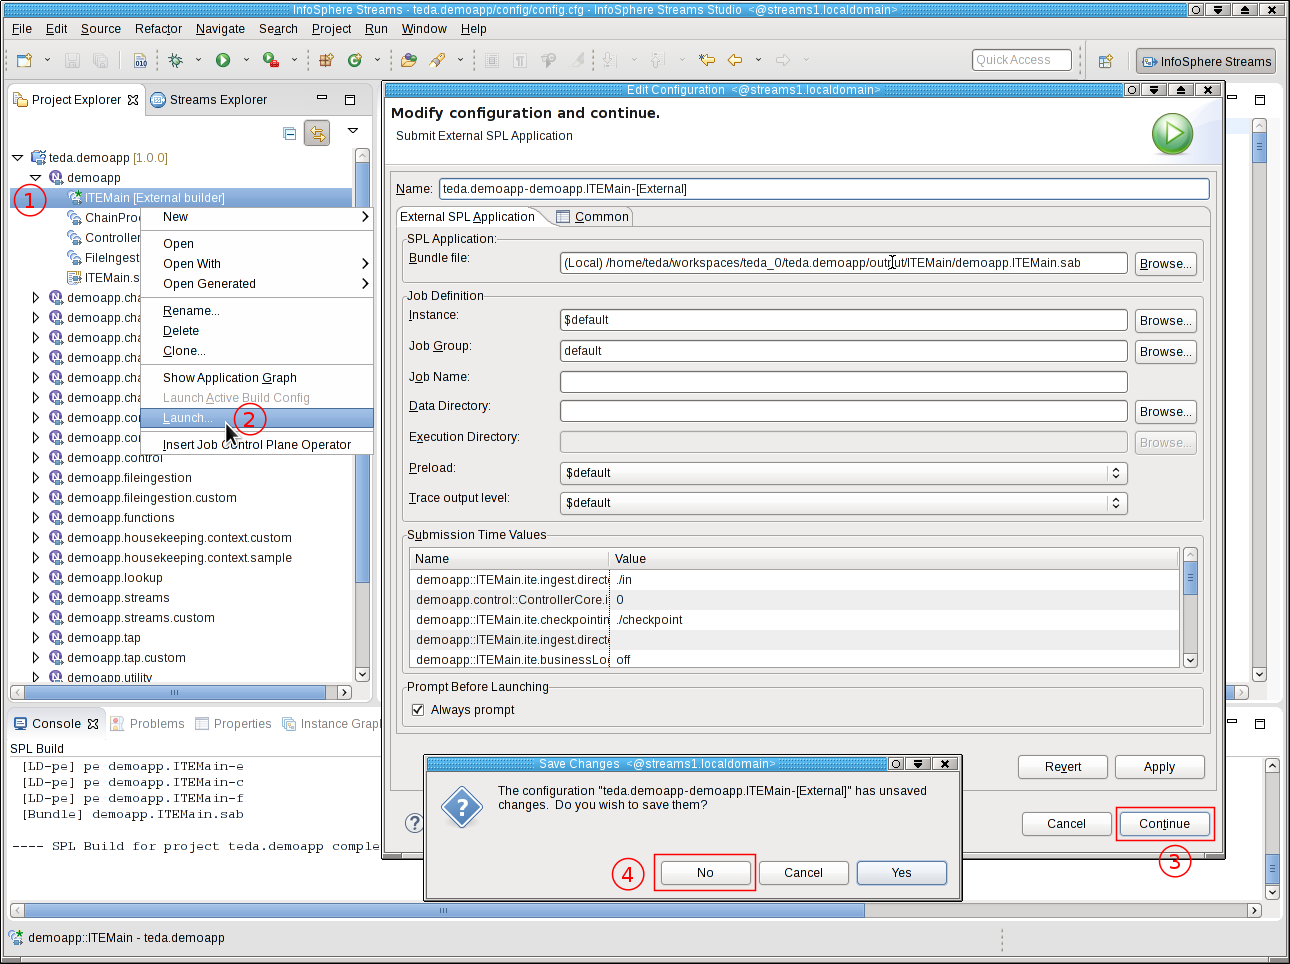
- Expand the demoapp namespace.
- Right-click on ITEMain [External builder].
- Select Launch… from the menu. The Edit Configuration dialog window opens.
- You can keep all submission time values, fusion, placement and threading settings as they are. Click Continue.
- In the Save Changes dialog, click No.
The application is submitted to your Streams instance.
Note: For the tutorial, you should always select No in the Save Changes dialog to avoid that Streams Studio creates a launch configuration for the application. The launch configuration contains the default values for the submission time parameters, which are derived from the TEDA configuration file. If you save the build configuration, and change the configuration file later, your application can be started with invalid or undesired submission time parameters.
If the Monitoring GUI is not yet running, start it now. To do so, open a terminal window and enter following commands:
cd $HOME/MonitoringGUI
./teda-monitor.sh
The Monitoring GUI starts and shows the ITEMain job. If you select a job, you can see the details of the selected job in the Job Details area of the application.
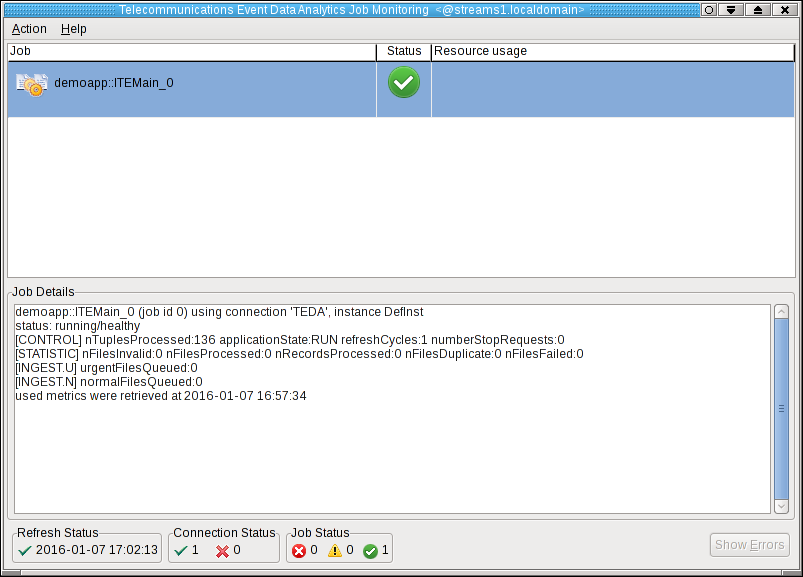
Note: During the startup phase of the application, its status might be displayed as critical. Some seconds later the application changes its status to healthy.
Moving sample data files to the application’s input directory to process the data
When you start the ITE application for the first time, it creates the directories for input, output, and other functions. With the default settings, these directories are created under WORKSPACE/teda.demoapp/data. After refreshing the Resources tree, you find them under teda.demoapp/Resources/data in the Project Explorer in Streams Studio. The in directory is the directory for input data, the out directory contains the various output files.
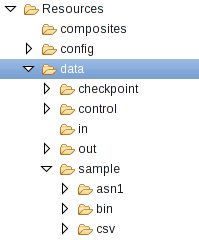
The sample directory contains sample files, which can be processed by an ITE application that uses the embedded sample code. Open a terminal window and change into the data directory. Then, move a file into the input directory:
cd WORKSPACE/teda.demoapp/data
mv sample/csv/TEDA_3_CSV11_20140815000000_6868.DAT in
Important: Always move the input files to make the files appear atomically in the target directory. If the files do not appear atomically in the input directories, the applications might read incomplete files.
After processing, the input file is moved from the in directory to in/archive. The out directory contains the sub-directories load, rejected, and statistics for the output files with successfully processed data, rejected data and statistics.

After refreshing the Monitoring GUI (press F5), the changed metrics reflect that the file is processed.

Shutting down the ITE application gracefully
Although you can cancel TEDA application jobs like any other IBM Streams job with the streamtool canceljob command, it is recommended that you use the teda-shutdown-job command line tool to gracefully shut down the application jobs.
Using teda-shutdown-job ensures that files, which are already in progress, are completely processed and queued commands end before the job is cancelled. Thus, the application has a consistent state and can be restarted faster, not needing time-consuming recovery actions.
You can find more information about stopping TEDA jobs in the IBM Knowledge Center: Reference > Toolkits > SPL standard and specialized toolkits > com.ibm.streams.teda > Operating applications > Stopping the Lookup Manager and ITE applications
If you completed module 1, this command is within your search path. Assuming that your job-ID is 0, you would enter
teda-shutdown-job 0
Remove the created directories from the data directory of the application to get a clean starting point for your next steps:
cd WORKSPACE/teda.demoapp/data
rm -r checkpoint control out
You can also close the Monitoring GUI.
Next Steps
You discuss the format of the input data and the requirements regarding the processing of your data. In the next module, you start the customization of the application, like defining SPL types that are used for the data, and customizing the parser and the processing logic.