Module 6 - Customizing for input files in binary format (ASN.1)
Edit meObjectives
In this module, you extend the ITE application that you created while following the instructions of the modules 1-5. You create a file reader for binary data files that contain data structures described in Abstract Syntax Notation One (ASN.1).
At the end of this module, your application can process Call Detail Records (CDRs) for text messages (SMS) and voice calls, which are stored in ASN.1 encoded binary data files. The payload data is the same as in your already processed CSV and Fixed-size structure input data.
After completing this module you should be able to:
- Configure the file ingestion to recognize the new type of input data files
- Configure the file reader for your new input data file type
- Implement a file reader for the ASN.1 encoded binary data
- Convert from parser output to the common FileReader output.
Prerequisites
You finished at least module 3 of the tutorial, in which you created a scalable Streams application that processes CDRs for SMS and voice calls from CSV files.
Concepts
The ASN.1 standard is a notation that describes structures and rules for encoding data in computer networking. It is a common notation used for the description of data structures in telecommunication networks.
The TEDA framework provides a powerful parser that decodes these structures and transforms them into SPL tuples. That parser needs to be configured to detect and decode exactly those structures that you need for your further processing.
Since you have different input data formats and input data record types but only one format for further processing and storing, you map all the incoming data to a common schema.
ASN.1 together with specific ASN.1 encoding rules facilitates the exchange of structured data, particularly between application programs separated by networks, by describing data structures in a way that is independent of machine architecture and implementation language.
The TEDA framework supports the Basic Encoding Rules (BER). Structures and substructures are encoded as type-length-value or TLV encodings.
For example, a section of the binary data stream can look like: 02 01 08. The meaning of the data is:
02 - Type tag indicating an INTEGER
01 - Length in octets of the data value that follows
08 - The value
The structure definition document or ASN.1 grammar file contains a concrete description of the data structures.
The ASN.1 grammar file
In this tutorial, you use data that is based on the sample ASN.1 grammar tutorial.asn. It starts like:
CCOMSSber
DEFINITIONS IMPLICIT TAGS ::=
BEGIN

--  MSC CALL AND EVENT RECORDS
MSCRecord ::= CHOICE
{
    mscSampleRecord          [1] MobileSampleMsg
}

MobileSampleMsg ::= SEQUENCE
{
    mscRecordType                       [0] MSCRecordType,
    mscRecordNumber                     [1] RecordNumber OPTIONAL,
    mscRecordStatus                     [2] RecordStatus OPTIONAL,
… some more lines
}
-- COMMON DATA TYPES
MSCRecordType ::= INTEGER
{
    mscSampleCallRecord          (1),
    mscSampleSMSRecord           (2)
}

RecordNumber ::= INTEGER
MSCRecord is the root ASN.1 structure. As each structure, it can contain one or more substructures. (Primitive types for example INTEGER contain no substructures.) mscSampleRecord is one substructure. It is of type MobileSampleMsg, which can contain further structures for example mscRecordType. MSCRecordType is of type INTEGER and only the values 1 and 2 are allowed.
Each substructure can be a trigger point for the parser to generate an SPL tuple. Whether you define only the root structure and/or some substructures as a trigger point depends on the specific project requirements. In this example you will use the mscSampleRecord.
Input and output interface
In module 3 and possibly in module 5 of the tutorial, you defined a common schema as an output of the CSV and the fixed-size structure data file readers. Since the input files contain the same data records (this time ASN.1 encoded), you use the same mapping relation between the input data record fields and the SPL tuple attributes. The following table defines not only the field mapping but also the data types for each field.
| No. | Common CDR output | Common Type | ASN.1 Input (reduced) | ASN.1 Type | Conversion |
|---|---|---|---|---|---|
| 01 | cdrRecordType | uint8 | mscRecordType | int64 | int64 -> uint8, reduced range |
| 02 | cdrRecordNumber | uint64 | mscRecordNumber | list<int64> | int64 -> uint64, only positives (default:0) |
| 03 | cdrCallReference | rstring | mscCallReference | list<blob> | default: empty string |
| 04 | cdrCallingImsi | rstring | mscCallingImsi | list<blob> | default: empty string |
| 05 | cdrCallingImei | rstring | mscCallingImei | list<blob> | default: empty string |
| 06 | cdrCallingNumber | rstring | mscCallingNumber | list<blob> | default: empty string |
| 07 | cdrCalledImsi | rstring | mscCalledImsi | list<blob> | default: empty string |
| 08 | cdrCalledImei | rstring | mscCalledImei | list<blob> | default: empty string |
| 09 | cdrCalledNumberTon | uint8 | mscCalledNumberTon | list<int64> | int64 -> uint8, reduced range (default:0) |
| 10 | cdrCalledNumberNpi | uint8 | mscCalledNumberNpi | list<int64> | int64 -> uint8, reduced range (default:0) |
| 11 | cdrCalledNumber | rstring | mscCalledNumber | list<blob> | default: empty string |
| 12 | cdrCallingSubsFirstLac | rstring | mscCallingSubsFirstLac | list<blob> | default: empty string |
| 13 | cdrCallingSubsFirstCi | rstring | mscCallingSubsFirstCi | list<blob> | default: empty string |
| 14 | cdrCauseForTermination | rstring | mscCauseForTermination | list<blob> | default: empty string |
| 15 | cdrCallType | uint8 | mscCallType | list<blob> | blob -> uint8, reduced range (default:0) |
| 16 | cdrSamMczDuration | uint64 | mscSamMczDuration | list<int64> | int64 -> uint64, only positives (default:0) |
| 17 | cdrCallingNumberTon | uint8 | mscCallingNumberTon | list<int64> | int64 -> uint8, reduced range (default:0) |
| 18 | cdrCallingNumberNpi | uint8 | mscCallingNumberNpi | list<int64> | int64 -> uint8, reduced range (default:0) |
| 19 | cdrCallReferenceTime | rstring | mscCallReferenceTime | list<blob> | default: empty string |
| 20 | cdrCallingSubsFirstMcc | uint64 | mscCallingSubsFirstMcc | list<int64> | int64 -> uint64, only positives (default:0) |
The ASN.1 Type is the type the frameworks built-in ASN1Parse operator generates out of the ASN.1 grammar file. For more information about the ASN1Parse operator refer to the IBM Knowledge Center Reference > Toolkits > SPL standard and specialized toolkits > com.ibm.streams.teda > com.ibm.streams.teda.parser.binary > ASN1Parse.
To match the data types of your already defined common output schema, you need the type conversation. The column ASN.1 Conversion describes the rules. You refer to this table later on in this module when you create the converter.
Customization Points
The following figure and table show the points that you need to customize in the ITE application during this module or that influence the customization like the different formats and stream schemas. Other parts don’t need to be customized because it is not necessary for this module.
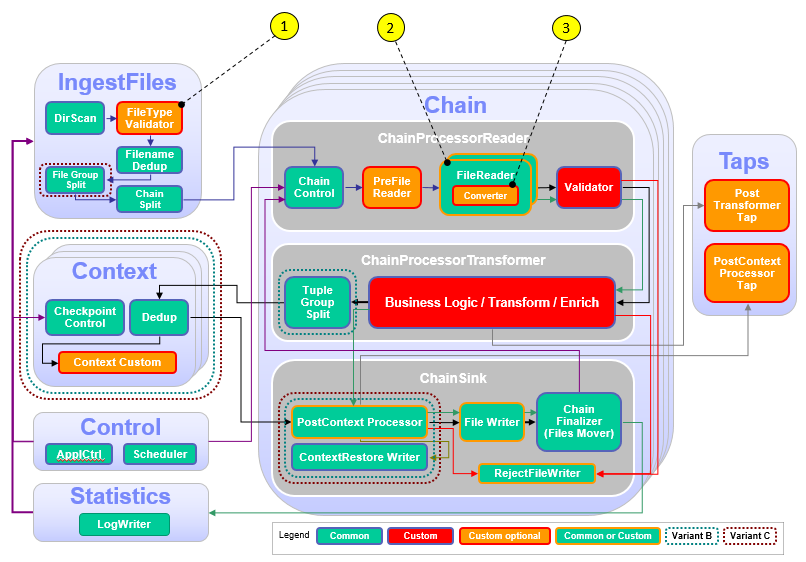
| Number | Functional Block | What needs to be customized? |
|---|---|---|
| 1 | FileTypeValidator | Custom code is necessary to derive the type of file format from the file name, the type is a custom string and needed later in the framework to route the file to the correct FileReader |
| 2 | FileReader | Different FileReaders are necessary: one containing an ASN.1 parser |
| 3 | Converter | Customize a possibly necessary conversion from parser output to the common FileReader output. |
Configuration
You do all configuration settings in the same manner as you did it in the previous modules. Expand teda.demoapp/Resources/config in the Streams Studios Project Explorer and open the config.cfg file. In all later steps, this opened file is referenced when talking about config.cfg.
Tasks
The configuration and customization consists of the following tasks:
- Configure the frameworks ingestion part to detect the new type of input data files.
- Configure the framework to connect the new file type to the appropriate file reader.
- Configure the framework to use a new file reader for your new input data file type.
- Provide the ASN.1 grammar file and create an SPL schema out of it.
- Create a file reader composite for the ASN.1 encoded binary data.
- Customize a conversion from parser output to the common FileReader output.
Customizing the file ingestion
According to the requirements, the file names have the following naming schema:
CDR_RGN<MSC_ID>_<YYYYMMDDhhmmss>.asn.
You already configured the file name pattern for CSV files and possibly for fixed-size structure data. Find the ite.ingest.directoryScan.processFilePattern parameter in the config.cfg and add the pattern for ASN.1 encoded binary data files.
ite.ingest.directoryScan.processFilePattern=.*_([0-9]{14})\.csv$|.*_([0-9]{14})\.bin$|.*_([0-9]{14})\.asn$
Customizing different file types
Every format (file type) requires another reader, so you specify the ite.ingest.customFileTypeValidator parameter to enable the support for multiple readers and file type verification.
If you already have done this configuration for example in module 5 of this tutorial, you can continue with the next task Configuring the file reader type.
You customize the demoapp.fileingestion.custom/FileTypeValidator composite operator, which is mentioned in the detailed parameter description. During this customization, you assign the uppercase file name extension to the fileType SPL attribute. That means, the .csv extension results in the CSV fileType value and .asn in ASN.
Add the following line below the description of the ite.ingest.customFileTypeValidator parameter in the config.cfg file.
ite.ingest.customFileTypeValidator=on
The demoapp.fileingestion.custom/FileTypeValidator is responsible to determine a file type. This determination can often be done using the file names or their extensions. In this case, you map the extensions to their uppercase counterpart. Since the file name patterns that are specified with the ite.ingest.directoryScan.processFilePattern parameter already ensure that each filename has a valid extension, you do not need to send tuples to the output port for invalid file names.
Open teda.demoapp/Resources/demoapp.fileingestion.custom/FileTypeValidator.spl and replace the operator implementation with the following code.
public composite FileTypeValidator
(
input
    stream<ProcessFileInfo> FilesIn;
output
    stream<ProcessFileInfo> FileOut,
    stream<ProcessFileInfo> InvalidOut
)
{
graph
    (
        stream<ProcessFileInfo> FileOut;
        stream<ProcessFileInfo> InvalidOut
    ) as FileTypePrepare = Custom(FilesIn as FileIn)
    {
        logic
        onTuple FileIn:
        {
            // The file name pattern that is specified with the
            // ite.ingest.directoryScan.processFilePattern parameter,
            // ensures that each incoming file name has an extension,
            // which is either .asn, .csv, or .bin.
            // The extension is used to build the value for the
            // fileType attribute, which can be: ASN, CSV, or BIN.
            FileIn.fileType = upper(substring(FileIn.filenameOnly, length(FileIn.filenameOnly) - 3, 3));
            submit(FileIn, FileOut);
        }
        onPunct FileIn:
        {
            if (currentPunct() == Sys.WindowMarker) submit(Sys.WindowMarker, FileOut);
        }
    }
}
Configuring the file reader type
You create a custom file reader to read your ASN.1 encoded binary data files. Add the relation between the file type identifier and the reader composite operator to the ite.ingest.reader.parserList parameter.
ite.ingest.reader.parserList=CSV|FileReaderCustomCSV,BIN|FileReaderCustomBIN,ASN|FileReaderCustomASN1
Customizing the ASN.1 file reader
Get the ASN.1 grammar file
The structure definition document or ASN.1 grammar describes the rules and structures of the binary data. In a real project, you get this essential file from the vendor of the network elements that generate the data files. The Streams installation includes an ASN.1 grammar that describes the encoding of the sample data files. You copy that grammar to your workspace:
cd <WORKSPACE>/teda.demoapp/etc/
cp $STREAMS_INSTALL/samples/com.ibm.streams.teda/demo/teda_tutorial/teda.tutorial/etc/tutorial.asn .
Refresh the view in the Streams Project Explorer to see the copied file there.
Although the ASN.1 grammar for this tutorial has a fairly large number of elements, the grammar is not complicated. It is a simple sequence of mostly optional attributes.
This ASN.1 grammar file is needed at two places:
- As a parameter at ASN.1 parser operator invocation
- To generate an SPL type for the output of the ASN.1 parser.
Read the documentation of the ASN.1 parser in the IBM Knowledge Center for further information. At this place, you only need to know that the ASN.1 parser automatically assigns ASN.1 encoded attributes to SPL schema attributes by name and type. If you use the same names for SPL attributes as in the ASN.1 grammar and use the default type substitution, you do not need to code assignments in SPL at parser instantiation.
Generating the SPL schema from ASN.1 grammar
Within your application, you need the SPL types for the tuples that the ASN.1 parser generates. Open teda.demoapp/Resources/etc/tutorial.asn in the Streams Project Explorer. The parent structure is a choice, which contains only one record structure. This substructure is the output from the parser and your start element for the SPL schema generation.
MSCRecord ::= CHOICE
{
    mscSampleRecord          [1] MobileSampleMsg
}
You use the spl-schema-from-asn1 tool to generate these types out of the ASN.1 grammar:
cd <WORKSPACE>/teda.demoapp/etc/
spl-schema-from-asn1 --output=demo.spl --pdu=MobileSampleMsg --namespace=demoapp.streams.custom tutorial.asn
Refresh the view in the Streams Project Explorer. The generated teda.demoapp/Resources/etc/demo.spl file contains the SPL code. It contains tuple definitions used as output schema of the ASN.1 parser. The parameter namespace is necessary because you put the final schema file into the namespace directory where the framework expects custom schemas.
The demo.spl file is very long because it contains the whole message structure and all of the element definitions. You need only a subset of them in your later processing. The parser already can omit elements that you don’t need. Therefore, you define a reduced output schema, and the parser automatically creates tuples with the reduced set of attributes.
You can use the reduced schema included in the Streams installation. Copy the reduced_asn1schema.spl file from the teda.tutorial to your project into the directory demoapp.streams.custom:
cd <WORKSPACE>/teda.demoapp/demoapp.streams.custom
cp $STREAMS_INSTALL/samples/com.ibm.streams.teda/demo/teda_tutorial/teda.tutorial/demoapp.streams.custom/reduced_asn1schema.spl .
rm <WORKSPACE>/teda.demoapp/etc/demo.spl
Refresh the view in the Streams Project Explorer. The file demo.spl can be deleted since it is not used in the project.
Creating the custom ASN.1 data file reader composite
Analog to the reader for CSV files, you copy the teda.demoapp/Resources/demoapp.chainprocessor.reader.custom/FileReaderCustom.spl file to FileReaderCustomASN1.spl and rename the contained composite from FileReaderCustom to FileReaderCustomASN1. This composite must be customized to use the built-in ASN.1 reader, which is demoapp.chainprocessor.reader::FileReaderASN1.
The file contains the composite with the instantiation of a file reader, which follows the frameworks reader interfaces. The framework already contains three configurable file readers: FileReaderCSV, FileReaderStructure and FileReaderASN1. You select the FileReaderASN1 file reader and set its parameter values.
You configure the following parameters for the FileReaderCustomASN1 composite:
parserRecordOutputType
Set the parameter to the type MobileSampleMsg, which is defined in the demoapp.streams.custom/reduced_asn1schema.spl file.
RecordConverterOperator
Set the parameter to the RecordConverter composite, which you will customize in the next task.
grammarFile
You use the etc/tutorial.asn file.
pdu
Defines the name of the root ASN.1 structure (PDU) that the parser needs to decode. You take it from the
MSCRecord ::= CHOICE
You set the value to MSCRecord.
trigger
You specify the structure name that you want the parser to generate tuples for. You can specify one or more triggers as a comma-separated string list. You want to get tuples for the structure mscSampleRecord. You take it also from the
mscSampleRecord [1] MobileSampleMsg
checkConstraints
Enables or disables ASN.1 constraints verification, for example restrictions on the allowed character set for ASN.1 primitive types. In this example, you set the value to false.
Open teda.demoapp/Resources/demoapp.chainprocessor.reader.custom/FileReaderCustomASN1.spl and replace the operator implementation with the following code.
public composite FileReaderCustomASN1 (
    input
        stream<TypesCommon.FileIngestSchema> FileIn;
    output
        stream<TypesCommon.ReaderOutStreamType> ReaderRec,
        stream<TypesCommon.ParserStatisticsStream> ReaderStat
) {
    param
        expression<rstring> $groupId;
        expression<rstring> $chainId;

    graph

    (
        stream<TypesCommon.ReaderOutStreamType> ReaderRec;
        stream<TypesCommon.ParserStatisticsStream> ReaderStat
    ) =
    // ------------------------------------------------
    // custom code begin
    // ------------------------------------------------
    // Select the file reader operator
    // a) FileReaderCSV or
    // b) FileReaderASN1 or
    // c) FileReaderStructure or
    // d) Create your own parsers based on CustomParserTemplate
    FileReaderASN1
    // ------------------------------------------------
    // custom code end
    // ------------------------------------------------
    (FileIn as IN) {
        param
            groupId : $groupId;
            chainId : $chainId;
            // ------------------------------------------------
            // custom code begin
            // ------------------------------------------------
            /**
             * operator record stream output type
             */
            parserRecordOutputType: MobileSampleMsg;
            /**
             * The operator that converts the decoded record tuples.
             */
            RecordConverterOperator: RecordConverter;
            /**
             * The absolute filename of the ASN.1 grammar file.
             * default dir is <app>/etc
             */
            grammarFile : "etc/tutorial.asn";
            /**
             * The name of the root PDU.
             */
            pdu : "MSCRecord";
            /**
             * The list of triggers.
             */
            trigger : "/mscSampleRecord";
            /**
             * Check ASN.1 constraints.
             */
            checkConstraints : false;
            // ------------------------------------------------
            // custom code end
            // ------------------------------------------------
    }
}
For more information about the ASN1Parse operator’s parameters read the Parameters section in the IBM Knowledge Center under: Reference>Toolkits>SPL standard and specialized toolkits>com.ibm.streams.teda>com.ibm.streams.teda.parser.binary>ASN1Parse
Creating the Converter composite for ASN.1 FileReader
Now you need a mapping from the output schema the ASN.1 parser is generating (out of the ASN.1 grammar file) to the common schema that all file readers create.
Because the ASN.1 parser generates list<…> attributes for each optional ASN.1 element, the converter checks whether there is an element in the list. If yes, then the value is converted. Otherwise, a default value (project developer decision, which is the default value for each element) is inserted.
Open teda.demoapp/Resources/demoapp.chainprocessor.reader.custom/RecordConverter.spl in the Project Explorer and add the following code:
Building and starting the ITE application
After restructuring the project, it is best practice to clean the project before starting a new build process. To do so, select on the Streams Studio main menu Project > Clean… and select the teda.demoapp project. Press OK.
To build the ITE application, right-click at the project teda.demoapp in the Project Explorer, and select Build Project from the menu.
You can again start the Monitoring GUI in a console window:
cd $HOME/MonitoringGUI
./teda-monitor.sh
Now start the ITE application. Go to the Project Explorer.
- Expand the namespace demoapp.
- Right-click on ITEMain [External builder].
- Select Launch… from the menu. The Edit Configuration dialog window opens.
- You can keep all submission time values. Click Continue.
- In the Save Changes dialog, click No.
The application is submitted to your Streams instance.
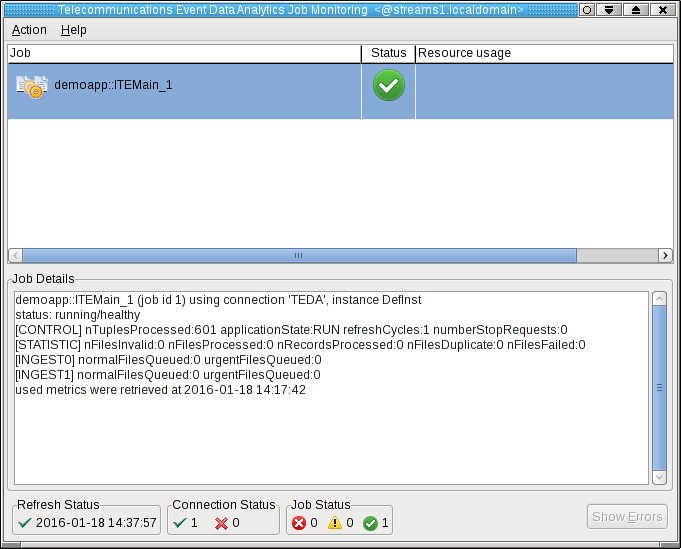
Shortly after that, the submitted application appears in the Monitoring GUI, and its status goes to healthy after some seconds. If you select the application in the Monitoring GUI, you see that all metrics have the value 0.
Moving sample data files to the application’s input directory to process the data
Since you did not configure directories for input and output, the default directories are used for the file interface. All these directories are subdirectories of the data directory of your SPL application. The input directory is WORKSPACE/teda.demoapp/data/in.
In module 3 of the tutorial, you already copied the *.asn data input files to the directory WORKSPACE/teda.demoapp/data/in/archive.
Now move them into the in directory to get them detected and processed. You must always move the files into the input directory to make the files appear atomically within the directory that is being scanned. This way, you avoid that a file is processed while it is still being copied.
Open a terminal window and run the following commands to move the files into the input directory of the ITE application:
cd WORKSPACE/teda.demoapp/data/in
mv -v archive/*.asn .
The files are processed within 5 seconds. You can press F5 in the Monitoring GUI to refresh the metrics immediately, not waiting for the next refresh cycle.
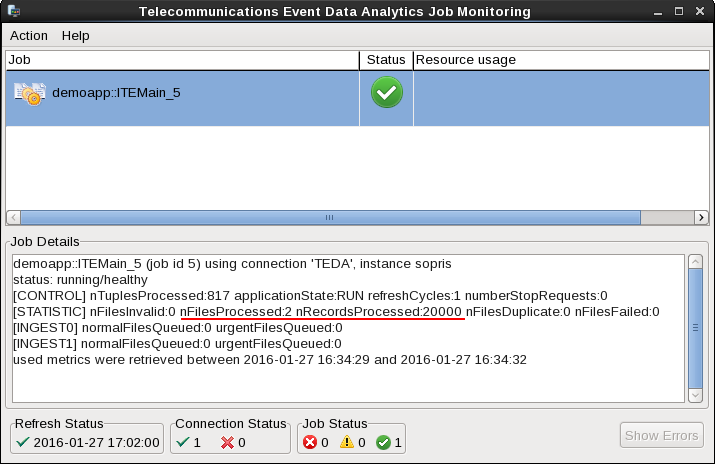
You can see, that the application processed two files with a total of 20000 tuples.
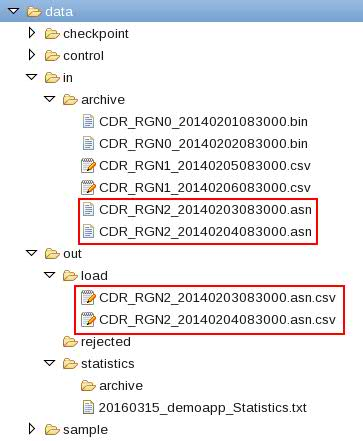
Refresh the Resources tree of the ITE project in the Project Explorer to see the newly created files.
What happened?
The ITE application processed the input files from the in directory and moved them back to in/archive. Note, that the archive directory contains also other files, which you copied before. The ITE application created also the files in the out/load directory. These files are the output files which contain the decoded CDRs.
Shutting down the ITE application gracefully and cleaning up
Typically, you use the teda-shutdown-job jobIds command to shut down an ITE application gracefully. In preparation for the next module of the tutorial, or to repeat the processing, you can also use streamtool or Streams Studio to cancel the job. For the next steps, or if you want to repeat this module, you must remove the history of the file name deduplication, which is stored in files in the checkpoint directory. It is also recommended to clean up the control and out directories.
- Cancel the job now by using teda-shutdown-job jobId
- Remove the checkpoint, control and out directories under your data directory and all its content.
You can remove them from Streams Studio or command line:
cd WORKSPACE/teda.demoapp/data
rm -rv checkpoint control out
Optionally, you can close the Monitoring GUI.
Next Steps
In the next module you enrich the data by using lookups from external data.