Module 11 - Lookup Manager with database source and Application Configuration
Edit meObjectives
In this optional module, you reconfigure the Lookup Manager application that you created in the module 7 to read the data from a database. You use the Application Configuration feature to specify the database credentials in the streams application.
At the end of this module, your application reads the database credentials from the streams platform and uses the database as source of the lookup information
After completing this module, you should be able to:
- Configure the Lookup Manager application for database sources
- Configure the Application Configuration with Streams Console
Prerequisites
The database configuration requires extra preparation in your environment. The general database configuration is described in the IBM Knowledge Center under:
- Reference>Toolkits>SPL standard and specialized toolkits>com.ibm.streams.teda 2.0.0>Developing applications>Configuring Solutions>Configuring Lookup Manager Applications>Working with enrichment data from databases
- Reference > Toolkits>SPL standard and specialized toolkits>com.ibm.streams.teda 2.0.0 > Developing applications > Customizing applications > Customizing the Lookup Manager application
The prerequisites for the sample that you use in this module:
-
You finished at least module 7 of the tutorial, in which you created and customized the Lookup Manager application.
-
The DB2 database must be installed and it must run
-
You must create the required database, here: DEMOAPP
SQL command example:
CREATE DATABASE DEMOAPP - You must create the required DEMODATA.IMSI_CRM database table with following columns:
IMSIdefined asVARCHAR (21)CUSTOMER_IDdefined asBIGINTCUSTOMER_TYPEdefined asBIGINT
SQL command example:
CREATE TABLE DEMODATA.IMSI_CRM (IMSI VARCHAR (21) NOT NULL, CUSTOMER_ID BIGINT NOT NULL, CUSTOMER_TYPE BIGINT NOT NULL ) -
Import the database table with content of the
IMSI_CRM.csv. Remember, you used this file in module 7 to complete the lookup data. The processed CSV file moved to:WORKSPACE/teda.lookupmgr/data/archive/<timestamp>_IMSI_CRM.csvSQL command example:
IMPORT FROM "IMSI_CRM.csv" OF DEL METHOD P (1, 2, 3) INSERT INTO DEMODATA.IMSI_CRM (IMSI, CUSTOMER_ID, CUSTOMER_TYPE ) -
Configure the environment for the
com.ibm.streams.db 2.0.0toolkit. You find details in the IBM Knowledge Center under Reference>Toolkits>SPL standard and specialized toolkits>com.ibm.streams.db 2.0.0>Developing and running applications that use the Database Toolkit.Here, you find the valid environment variables for the DB2 database: *
STREAMS_ADAPTERS_ODBC_INCPATH=<db2-install-path>/include/*STREAMS_ADAPTERS_ODBC_LIBPATH=<db2-install-path>/lib64/*STREAMS_ADAPTERS_ODBC_DB2=1 -
The UnixODBC driver must be installed http://www.unixodbc.org
-
You must configure
odbc.inifor the UnixODBC driver, as follows:[DEMOAPP] Driver = DB2 description = DEMOAPP database on DB2 ServerName = //<db2-server-address>:50000 -
You must configure
odbcinst.inifor the UnixODBC driver, as follows:[DB2] Description = DB2 driver Driver = <path-to-db2-lib-folder>/libdb2.so FileUsage = 1 DontDLClose = 1
Concepts
Imagine, you have the DB2 database available in the system, where you deploy your IBM Streams application. This database provides the business data that you need for your enrichment processing and they update once a day.
You could copy the data to the CSV files, but this processing is not useful. Access the database directly. The Lookup Manager uses the com.ibm.streams.db 2.0.0 toolkit to access the information included in the DB2 database.
A periodical change of the database credentials is the typical requirement in a customer environment. You can specify the properties for the database access in the Streams Console. The application framework read these configuration properties to access the source of the lookup data. If the database credentials change, then you must update the Application Configuration in the Streams Console. The running Lookup Manager application takes over the updates at the next database access.
Customization Points
The following table shows the points that you need to customize in the ITE application during this module or that influence the customization like the different formats and stream schemas. Other parts don’t need to be customized because it is not necessary for this module.
| Number | Functional Block | What needs to be customized? |
|---|---|---|
| 1 | connections.xml | Configure the connections data for the com.ibm.streams.db toolkit. |
| 2 | LookupMgrCustomizing.xml | Customize the references to database connections. |
Configuration
You do all configuration settings in the same manner as you did it in the previous modules. Expand teda.lookupmgr/Resources/config in the Streams Studios Project Explorer and open the config.cfg file. In all later steps, this opened file is referenced when config.cfg is mentioned.
Tasks
The configuration and customization consists of the following tasks:
- Configure database connections
- Configure the database as lookup data source
- Customize the database connection references in the LookupMgrCustomizing.xml file
- Create the Application Configuration in the Streams Console
Configure database connections
You must specify the database connections as described in the IBM Knowledge Center under Reference>Toolkits>SPL standard and specialized toolkits>com.ibm.streams.db 2.0.0>Connection specifications document for the Database Toolkit
The values that you need for this sample are specified as follows:
- Connection specification in the
<connection_specification>element.-
The name refers to the database name as specified in the prerequisites:
name="DEMOAPP" -
All attributes are empty strings in the ODBC element. You use the Application Configuration properties from Streams Console or you specify them at submission time.
-
- Access specification in the
<access_specification>element.-
The name is a reference that is required for configuration by the
com.ibm.streams.dbtoolkit:name="ImsiCRM" -
The statement describes the query request in the
<statement>element that provides data with lookup information, here the sample:statement="SELECT IMSI, CUSTOMER_ID, CUSTOMER_TYPE FROM DEMODATA.IMSI_CRM WITH UR" isolation_level="READ_COMMITTED" - The
<parameters>element does not require any setting. -
The access specification refers to specified database connection in
<uses_connection>element:connection="DEMOAPP" -
You specify the native table schema in the
<column>elements of the<native_schema>element. The data type mapping from database types to SPL types is specified in Reference>Toolkits>SPL standard and specialized toolkits>com.ibm.streams.db 2.0.0>Connection specifications document for the Database Toolkit>Access specification element for the Database Toolkit>Native_schema element>Column element. According to the generatedSchemaIMSI_CRMtuple specification in thecommon.lookup.lookuptypes::LookupMgrTypescomposite:static SchemaIMSI_CRM = tuple< rstring lookup_cmd, // mandatory for command handling rstring imsi, // reference to database column int64 customerId, // reference to database column int64 customerType // reference to database column >;you define the relevant columns in the database table.
  name="IMSI" type="CHAR" length="21"
  name="CUSTOMER_ID" type="BIGINT"
  name="CUSTOMER_ID" type="BIGINT"
-
Create the teda.lookupmgr/Resources/connections.xml file of the SPL project teda.lookupmgr, and complete the sample content by the following lines.
<?xml version="1.0" encoding="UTF-8"?>
<st:connections xmlns:st="http://www.ibm.com/xmlns/prod/streams/adapters" xmlns:xsi="http://www.w3.org/2001/XMLSchema-instance">
  <connection_specifications>
    <connection_specification name="DEMOAPP" >
      <ODBC database="" user="" password=""/>
    </connection_specification>
  </connection_specifications>
  <access_specifications>
    <access_specification name="ImsiCRM">
      <statement statement="SELECT IMSI, CUSTOMER_ID, CUSTOMER_TYPE FROM DEMODATA.IMSI_CRM WITH UR" isolation_level="READ_COMMITTED" />
      <parameters></parameters>
      <uses_connection connection="DEMOAPP" />
      <native_schema>
        <column name="IMSI" type="CHAR" length="21"/>
        <column name="CUSTOMER_ID" type="BIGINT"/>
        <column name="CUSTOMER_TYPE" type="BIGINT"/>
      </native_schema>
        </access_specification>
      </access_specifications>
    </st:connections>
Configure the database as lookup data source
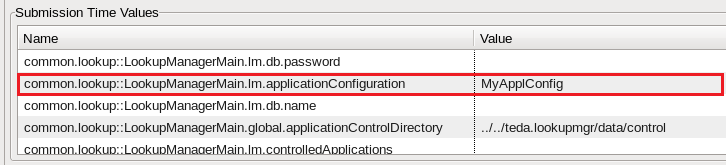
You specify the database as the source for the lookup repository in the config.cfg file of the teda.lookupmgr project. The database name, the user name, and the user password are submission time parameters. If you specify the values at the submission of the Lookup Manager application, then you define the default values. The running application uses the specification of the Application Configuration that you create in the Streams Console to update credentials. The database vendor is DB2 per default.
You must refer to the name of the Application Configuration that you create in the Streams Console. It is a configuration parameter of the teda.lookupmgr project that you specify in the config.cfg file.
You can use the CSV file as well as the database as lookup sources. This configuration is an option. If you specify both sources, then you must decide during creation of the command file, which source you are going to use. The sample shows how to turn off the CSV file sources.
-
Specify the database source. The connection name refers to the connection specified in connections.xml.
lm.db=off lm.db.connectionName=DEMOAPP -
Specify the name Application Configuration to
MyApplConfig.lm.applicationConfiguration=MyApplConfig -
Turn off the file as source type. This setting is an optional task.
lm.file=off
Customize the database connection references in the LookupMgrCustomizing.xml file
You must complete the customizing of the teda.lookupmgr/Resources/LookupMgrCustomizing.xml file of the SPL project teda.lookupmgr to specify the references that the database access requires.
The <DataSource> elements specify those references, that you need for the sample:
- You must add the
DbAccessSpecification="ImsiCRM"attribute next to theName="IMSI_CRM"attribute in the<DataSource>element to create the name reference of the access specification that is specified in the teda.lookupmgr/Resources/connections.xml. - Each
ValueDefinitionattribute needs the name reference to the corresponding database column. You specify it with theDbColumnNameattribute.
Open the teda.lookupmgr/Resources/LookupMgrCustomizing.xml file of the SPL project teda.lookupmgr and replace the sample content by the following lines.
<?xml version="1.0" encoding="utf-8"?>
<LookupManager xmlns="http://www.ibm.com/xmlns/prod/streams/teda" xmlns:xsi="http://www.w3.org/2001/XMLSchema-instance" xmlns:teda="http://www.ibm.com/xmlns/prod/streams/teda" SchemaVersion="2.0" xsi:schemaLocation="http://www.ibm.com/xmlns/prod/streams/teda etc/LookupMgrCustomizing.xsd">
  <DataSources>
  <!--Indexing begins with 0-->
    <DataSource Name="IMSI_CRM" DbAccessSpecification="ImsiCRM">
      <ValueDefinition SPLType="rstring" Name="imsi" Description="Lookup key: Subscriber IMSI." IndexInInputFile="0" DbColumnName="IMSI" />
      <ValueDefinition SPLType="int64" Name="customerId" Description="Lookup result: customerId." IndexInInputFile="1" DbColumnName="CUSTOMER_ID" />
      <ValueDefinition SPLType="int64" Name="customerType" Description="Lookup result: customerType." IndexInInputFile="2" DbColumnName="CUSTOMER_TYPE" />
    </DataSource>
  </DataSources>
  <Segments>
    <Segment Name="segmentDemoApp" DataSource="IMSI_CRM" Size="1200" Unit="MB">
      <Stores>
        <Store Name="ImsiMap">
          <ValueAssignment SPLType="int64" Name="customerId" SPLExpression="customerId"/>
          <ValueAssignment SPLType="int64" Name="customerType" SPLExpression="customerType"/>
          <KeyAssignment SPLType="rstring" SPLExpression="imsi"/>
        </Store>
      </Stores>
      <Applications>
        <Application Namespace="demoapp"/>
      </Applications>
    </Segment>
  </Segments>
</LookupManager>
To download LookupMgrCustomizing.xml
You finished customizing of the Lookup Manager application. You can build the project now.
To build the Lookup Manager application project, right-click the teda.lookupmgr project and select Build Project from the menu. You don’t need to build the demoapp project.
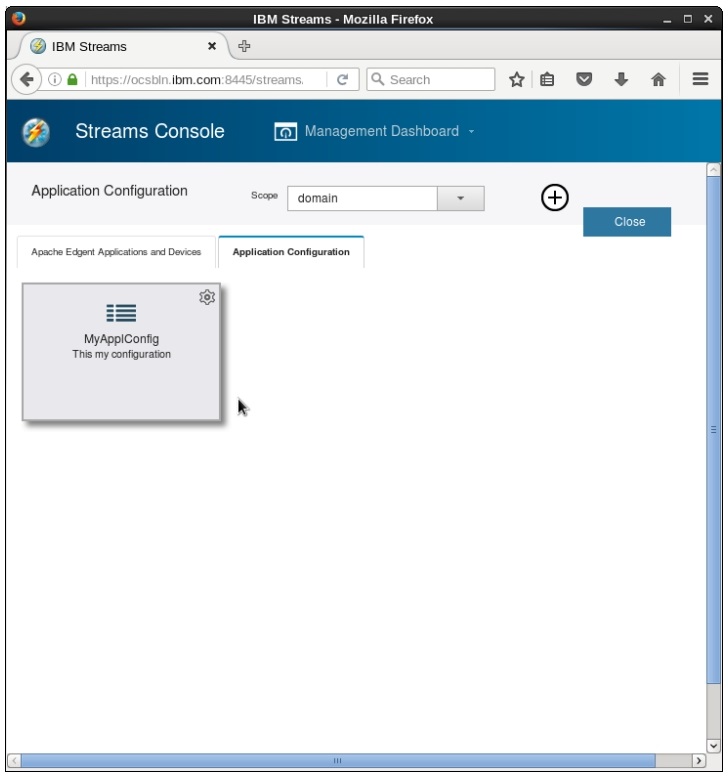
Create the Application Configuration in the Streams Console
The general description, how to create an Application Configuration, you find in the IBM Knowledge Center under Reference>Toolkits>SPL standard and specialized toolkits>com.ibm.streams.teda 2.0.0>Developing applications > Configuring Solutions > Configuring Lookup Manager Applications > Working with enrichment data from databases > Configure your Lookup Manager to use data from database > Configure your Lookup Manager with Application Configuration.
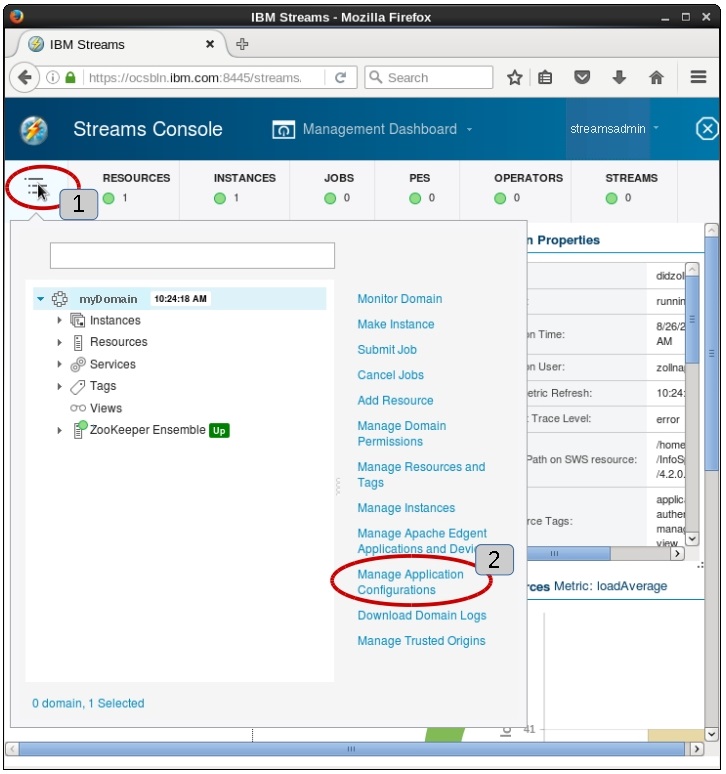
Open the Streams Console and select menu and then Manage Application Configurations.
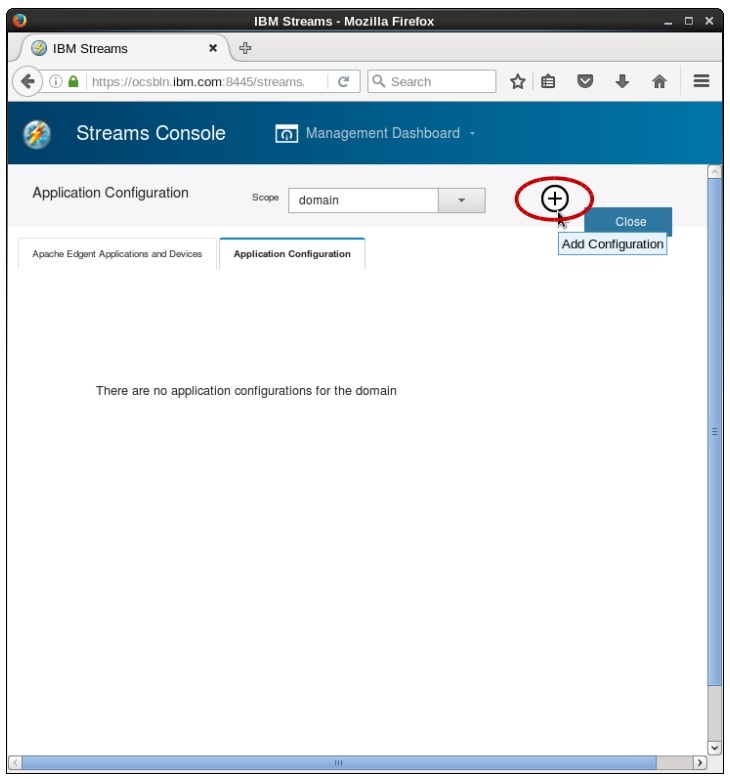
Click the + button to add the configuration.
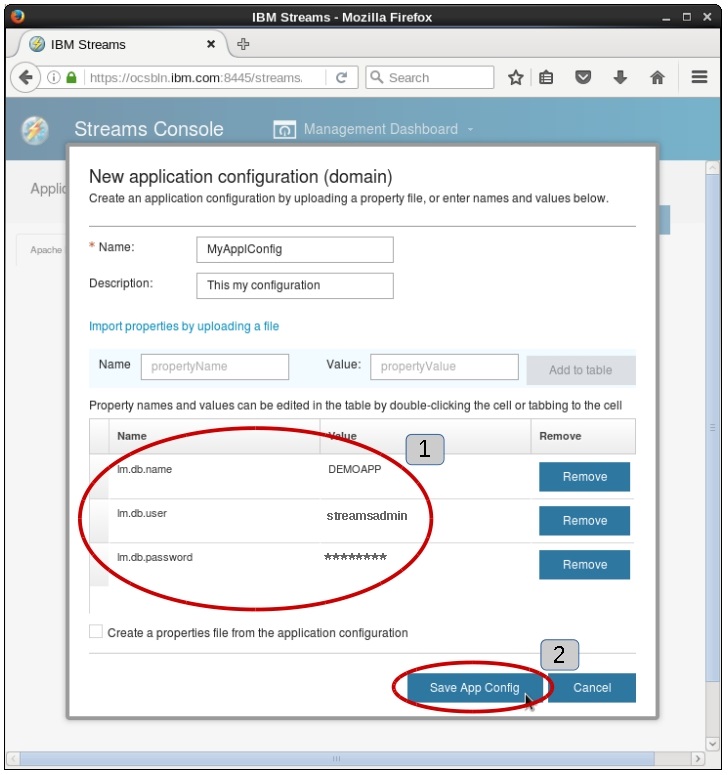
Complete the Name of the Application Configuration with the MyApplConfig value and the Description in the dialog window. Specify the lm.db.name property with the DEMOAPP value. Finally add the property to the property table by selecting the Add to table button.

Do the same for following properties:
- Complete lm.db.user with your database user name, here streamsadmin
- Complete lm.db.password with the password of the database user
Finally, push Save App Config to close the dialog.
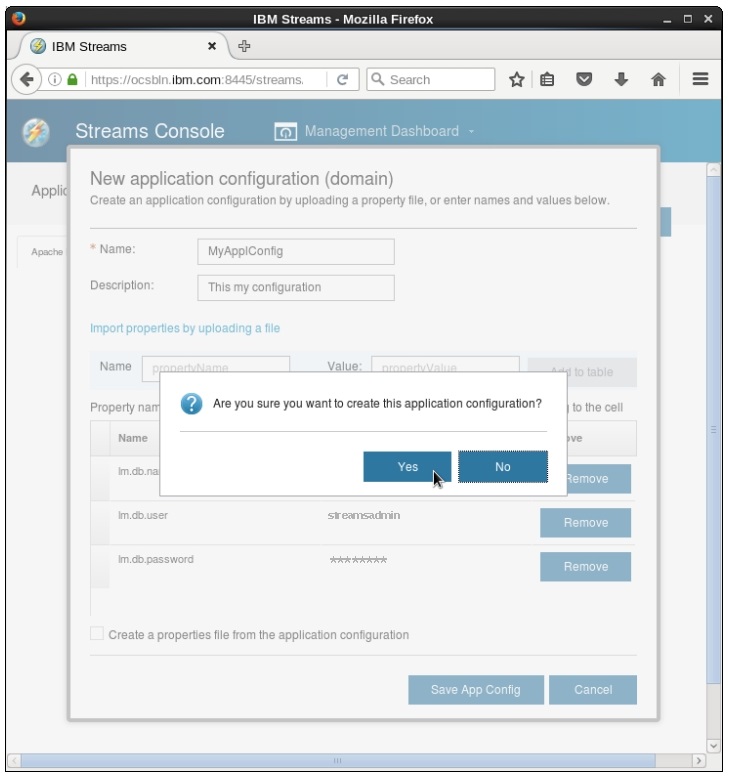
Confirm the creation of Application Configuration with Yes.
The specified MyAppConfig configuration is visible in the Streams Console. Here, you can update the database credentials.
The configuration and customizing of the Lookup Manager is done. You can prepare and start the applications.
Preparing the external data
As you know, the Lookup Manager application initializes and updates the data that the ITE application uses for enrichment. If you configure the database as the source then you must check whether the DB2 database is running. If it isn’t running, then call the db2start command. Connect to the DEMOAPP and check again if the database table exists and includes the required data. This check is a part of prerequisites.
Don’t care about the IMSI_CRM.csv file it is not required.
Starting the applications
You process the same files as in previous modules. The application rejects the processing of the input file because the files duplication is detected. To avoid it, you must shutdown the applications and clean checkpoint files as described in Module 7: Shutting down the applications and cleaning up
- Ensure that the Streams Domain and Streams Instance are running. Start the Monitoring GUI.
- Launch the Lookup Manager application as Distributed in a running instance. Verify and adjust submission time parameters common.lookup::LookupManagerMain.lm.applicationConfiguration if the launch configuration was saved before.
- Launch the ITE application as Distributed in the same running instance.
Loading the lookup data
The Module 7: Loading the lookup data up describes the process of the lookup data loading.
Discussing the results
The results of ITE file processing are exactly the same as in previous modules. You cannot observe any difference in the file processing.
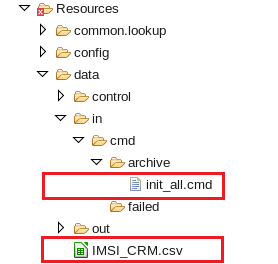
In opposite to load result that Module 7 describes, the IMSI_CRM.csv file is not moved to the archive directory.
Only, the init_all.cmd command file moves to the archive folder.
Next steps
In the next module you work with the exporter plug-in as an optional interface for external applications.